Guest User!

You are not Sophos Staff.

This discussion has been locked.
You can no longer post new replies to this discussion. If you have a question you can start a new discussion

POP3 email protection set up - outlook always asking about certificate

I have Sophos UTM 9.7 scanning my emails using Oultook client but whenever I start outlook it complains about the self signed certificate. If I view the certificate it does allow me to install it and I said yes but that doesn't fix the problem

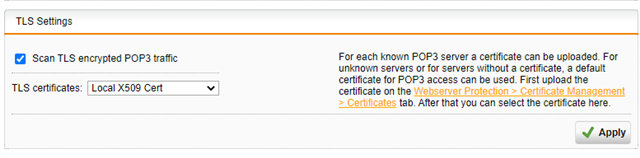
In Sophos I selected the local cert as I don't have one specifically for Outlook (or for anything, actually). If I don't select to scan TLS traffic, nothing gets scanned as all my email accounts use TLS.

What do I need to do to make it is so Outlook doesn't ask me about cert every time I start it?

Any info would be appreciated


This thread was automatically locked due to age.
Parents
  • This is not unexpected, but is easily fixed.   The answer starts with an explanation of how certificates work.

    On connection, a server returns a certificate asserting its identity.   That certificate is signed by an intermediate certificate, which is signed by a root certificate.   As long as the digital signature can be validated, we know that the certificate is unaltered from when it was created.   But to trust the certificate as a valid assertion of identity, we have to trust the root certificate.    This is implemented by installing the root certificate on your PC.   The presence of the root certificate means that your PC believes that the root certificate will never issue a fraudulent identity certificate.   Therefore, when each certificate in the chain has a valid signature, and a copy of the root certificate is installed on your PC, then the server identity is trusted as accurate.

    Next, your PC compares the DNS name used to start the connection with the names returned in the server certificate.   If there is a name match and a valid certificate chain, this proves that you have arrived at your intended network destination.    This validation is more important than https encryption itself, because it does no good to have an encrypted conversation if you are having that conversation with a malicious impersonator.

    For UTM to protect your client, it needs to implement a man-in-the-middle interception.    It issues a certificate claiming to be your remote server, issued by a root certificate that is also part of UTM.   Your client connects to UTM using the lookalike certificate chain, then UTM connects to the remote server on your behalf.   The traffic in each direction is decrypted at the UTM, so that UTM can inspect it for safety.

    For this to work without certificate errors, UTM needs to present the right certificate name to your PC, and your PC has to install the UTM root certificate as trusted.   

    • Go to Webserver... Certificate Management... Certificates and generate a certificate for the remote server name.   
    • Next, go to the Certificate Authorities tab, find the VPN signing CA, download it in PEM format (not PKCS!).
    • Install the downloaded certificate onto your PC.  On Windows, double-clicking will probably be sufficient.  If not, open MMC.EXE, then add the Snap-In for Certificates...  Computer Account... Local Computer, and do All tasks... Import.   When prompted, choose the option to automatically pick the certificate store.
    • Finally, on the POP3... Advanced tab, change the TLS section to use the named certificate that you generated to imitate the actual server.

    Test your POP connection to verify that the certificate error has gone away.

    Appendix:

    Why PEM and not PKCS12 format for the file download?

    Every certificate has a private key, which is used for signing other certificates and is used for establishing an encrypted session.    The private key is not used for verifying signatures.    Downloading the root certificate in PKCS#12 format will include the private key in the download.   Then when you install it on your PC, it gains the power to create a certificate which will be trusted by any other machine that has installed the root cerrtificate.   This would be dangerous.    We only want UTM to have the ability to do this.    Downloading the certificate in PEM format gives the certificate without the private key, which gives you everything needed to trust certificates coming from UTM without giving you the ability to create your own certificates using that root.

    Hope this helps and does not confuse,

    Doug Foster 

Reply
  • This is not unexpected, but is easily fixed.   The answer starts with an explanation of how certificates work.

    On connection, a server returns a certificate asserting its identity.   That certificate is signed by an intermediate certificate, which is signed by a root certificate.   As long as the digital signature can be validated, we know that the certificate is unaltered from when it was created.   But to trust the certificate as a valid assertion of identity, we have to trust the root certificate.    This is implemented by installing the root certificate on your PC.   The presence of the root certificate means that your PC believes that the root certificate will never issue a fraudulent identity certificate.   Therefore, when each certificate in the chain has a valid signature, and a copy of the root certificate is installed on your PC, then the server identity is trusted as accurate.

    Next, your PC compares the DNS name used to start the connection with the names returned in the server certificate.   If there is a name match and a valid certificate chain, this proves that you have arrived at your intended network destination.    This validation is more important than https encryption itself, because it does no good to have an encrypted conversation if you are having that conversation with a malicious impersonator.

    For UTM to protect your client, it needs to implement a man-in-the-middle interception.    It issues a certificate claiming to be your remote server, issued by a root certificate that is also part of UTM.   Your client connects to UTM using the lookalike certificate chain, then UTM connects to the remote server on your behalf.   The traffic in each direction is decrypted at the UTM, so that UTM can inspect it for safety.

    For this to work without certificate errors, UTM needs to present the right certificate name to your PC, and your PC has to install the UTM root certificate as trusted.   

    • Go to Webserver... Certificate Management... Certificates and generate a certificate for the remote server name.   
    • Next, go to the Certificate Authorities tab, find the VPN signing CA, download it in PEM format (not PKCS!).
    • Install the downloaded certificate onto your PC.  On Windows, double-clicking will probably be sufficient.  If not, open MMC.EXE, then add the Snap-In for Certificates...  Computer Account... Local Computer, and do All tasks... Import.   When prompted, choose the option to automatically pick the certificate store.
    • Finally, on the POP3... Advanced tab, change the TLS section to use the named certificate that you generated to imitate the actual server.

    Test your POP connection to verify that the certificate error has gone away.

    Appendix:

    Why PEM and not PKCS12 format for the file download?

    Every certificate has a private key, which is used for signing other certificates and is used for establishing an encrypted session.    The private key is not used for verifying signatures.    Downloading the root certificate in PKCS#12 format will include the private key in the download.   Then when you install it on your PC, it gains the power to create a certificate which will be trusted by any other machine that has installed the root cerrtificate.   This would be dangerous.    We only want UTM to have the ability to do this.    Downloading the certificate in PEM format gives the certificate without the private key, which gives you everything needed to trust certificates coming from UTM without giving you the ability to create your own certificates using that root.

    Hope this helps and does not confuse,

    Doug Foster 

Children
No Data