

This guide is intended for those who want to setup a Copernicus Sophos Firewall OS using VirtualBox on their laptop or desktop using a single network interface.
What you need:
This assumes you already have VirtualBox installed on your host platform of choice (I'm using my MacBook Pro). It also assumes that your host is connected to a network (home or office) that has internet access via WiFi or Ethernet (this is required for device registration to succeed).
You'll need the VMware Copernicus Beta download from sophos.com/copernicusbeta. That package contains a VirtualBox OVF. Double-click the OVF file to import it into VirtualBox.
VirtualBox and VM Setup:
Before we get into the settings for the VM, you need to setup a Host-only Network in VirtualBox > Preferences > Network.
This will create a virtual LAN inside your host that will allow you to connect using your browser to the LAN side of the virtual Firewall and access the management console to register and do the initial setup.
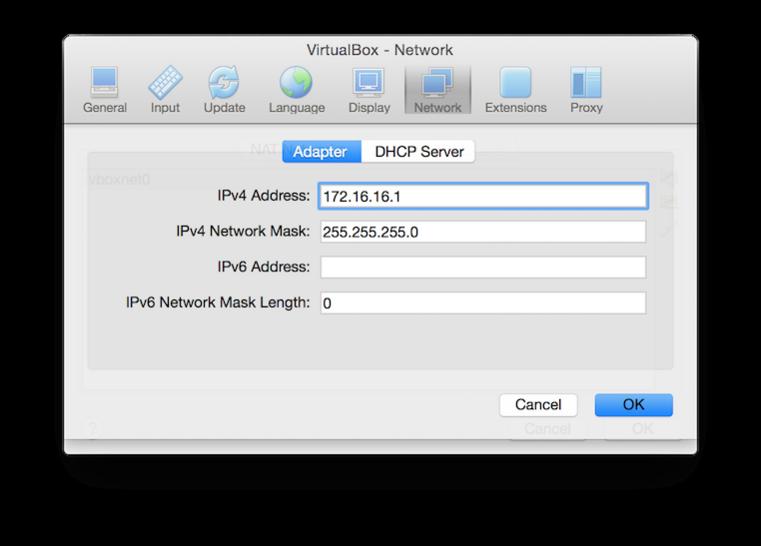
1. Create a new Host-only Network (default name is fine) and then set the Adapter to 172.16.16.1 with a netmask of 255.255.255.0 as shown in the first attachment.
2. If you want the virtual LAN to have it's own DHCP service, you can setup the DHCP Server for the Host-only network as shown in the second attachment. However, if you plan to have your Virtual Copernicus Firewall offer DHCP service to the virtual LAN, then skip this step (do not configure DHCP in VirtualBox), and instead setup DHCP in Copernicus after you get it installed and setup.
Now you can setup the networking for the VM...
3. Select your VM > Settings > Network > Adapter 1 and configure it as shown in the third attachment. Select "Host-ony Adapter" and then select the VirtualBox Host-only Network you created in steps #1 and #2 (vboxnet0 in my example). This will connect the LAN side of the Firewall to the virtual network you created above on the 172 subnet.
4. Select Adapter 2 as shown in the last attachment. Select a "Bridged Adapter" and then for "Name:" choose whatever interface your laptop or desktop is using to connect to your real network. This will connect the WAN side of the Firewall to your real network.
That's it for configuration, but if you plan to use the Firewall extensively and have more RAM to spare, you might want to bump up the RAM setting under Settings > System. You may also need to bump up the Video Memory to 16MB under Settings > Display.
You can then Start your virtual Firewall and follow the rest of the Getting Started Guide in the main sticky post to register and setup your virtual Firewall. Just note that it may take a couple of minutes for the Firewall to start before you will be able to connect to the management interface at 172.16.16.16.
Enjoy!
