

Disclaimer: Sophos also has a Migration Desk available to all Partners (and subsequently customers) free of charge who will help plan, execute, and verify migrations of your existing firewall or Sophos UTM to Sophos Firewall as well as XG to XGS hardware migrations.
- For Sophos Partners: The Sophos Migration Desk can be engaged from the Sophos Partner Portal
- For Sophos Customers: Please review the Online Help: https://docs.sophos.com/support/migration/en-us/firewall/index.html
We want to provide some easy ways to migrate Sophos UTM configuration parts to Sophos Firewall with the UTM API and Import/Export Feature in SFOS. In this Recommended Reads, we will provide example Powershell Scripts to migrate some features and options to SFOS as you need them.
Those scripts follow an easy approach: They will download the configuration via JSON UTM API and convert this content to a XML File. The XML File is usable in SFOS.
For more information about the approach, see: Creating XML Objects with notepad++ for mass import
Sophos UTM offers a full API for the entire configuration and a "Swagger" tool. See: https://www.sophos.com/en-us/medialibrary/PDFs/documentation/UTMonAWS/Sophos-UTM-RESTful-API.pdf
You can access the API of Sophos UTM by using https://IP:4444/api
The Swagger UI offers you the Schema used by UTM for each and every feature.
For example: Network Host Objects:
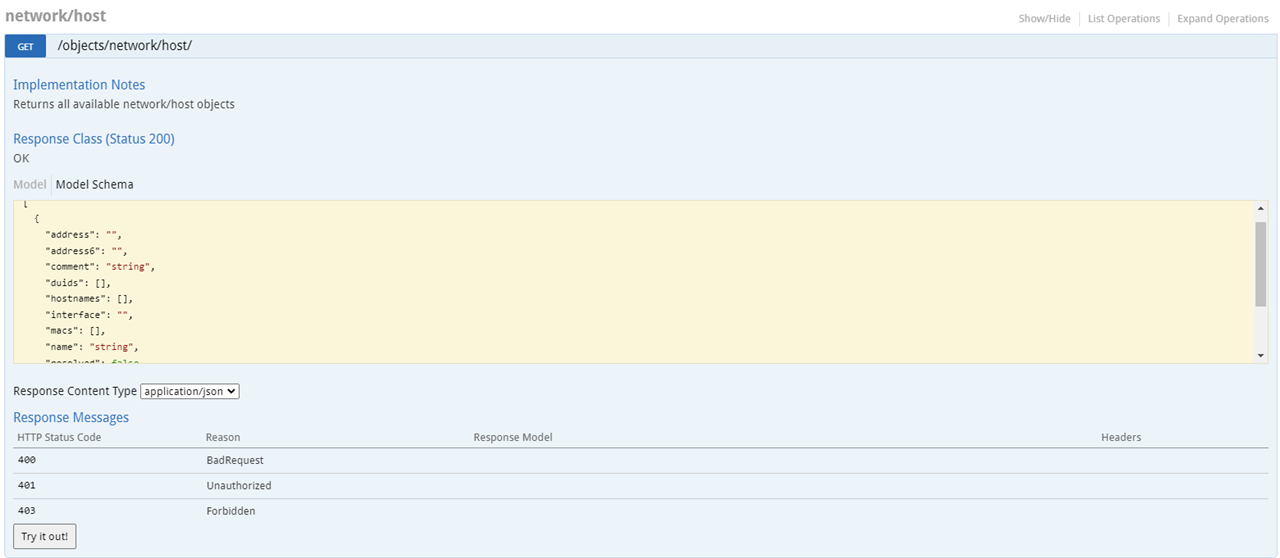
It will show you the CURL request and Token you need to do for GET the data. You will also see the format in this code.
We can now use the data, we get via API and convert it to XML Data. We need to simply map the matching points of UTM to SFOS.
In the #1 example below: We map the data of UTM "name" to SFOS name and we map the IP address to the IP address. Then add the rest of the XML code, which is static.
The approach of this migration is always the same, fetch the data, convert it to XML and save it.
Please replace the IP and the Authorization Token in the Script and run it via Powershell.
#1 Convert Host Objects to XML.
#Code to accept untrusted UTM connections. Not needed, if you use a trusted CA for the UTM webadmin.

add-type @"
using System.Net;
using System.Security.Cryptography.X509Certificates;
public class TrustAllCertsPolicy : ICertificatePolicy {
    public bool CheckValidationResult(
        ServicePoint srvPoint, X509Certificate certificate,
        WebRequest request, int certificateProblem) {
            return true;
        }
 }
"@
[System.Net.ServicePointManager]::CertificatePolicy = New-Object TrustAllCertsPolicy
Enable-TlsCipherSuite -Name "TLS_ECDHE_RSA_WITH_AES_256_GCM_SHA384" -Position 0


# Define the URL for the API // Replace the IP with your UTM IP.
$url = "https://172.25.105.16:4444/api/objects/network/host/"

# Define the headers for the request // Replace the Authorization Code with your UTM Code. See Swagger.
$headers = @{
    Accept = "application/json"
    Authorization = "Basic YWRtaW46U29waG9zLjE="
}

# Send a GET request to the API and store the result in a variable
$jsonResult = Invoke-RestMethod -Uri $url -Headers $headers -Method Get

# Convert the JSON data to XML
$xmlResult = [xml]@"
<?xml version="1.0" encoding="UTF-8"?>
<Configuration APIVersion="1905.1" IPS_CAT_VER="1">
$(
    foreach ($item in $jsonResult) {
        "  <IPHost>"
        "    <Name>$($item.name)</Name>"
        "    <IPFamily>IPv4</IPFamily>"
        "    <HostType>IP</HostType>"
        "    <IPAddress>$($item.address)</IPAddress>"
        "  </IPHost>"
    }
)
</Configuration>
"@

# Save the XML data to a file in the same directory as the script
$filePath = Join-Path -Path (Split-Path -Path $MyInvocation.MyCommand.Path -Parent) -ChildPath "Entities.xml"
$xmlResult.Save($filePath)
#2 Convert Network Objects to XML
add-type @"
using System.Net;
using System.Security.Cryptography.X509Certificates;
public class TrustAllCertsPolicy : ICertificatePolicy {
    public bool CheckValidationResult(
        ServicePoint srvPoint, X509Certificate certificate,
        WebRequest request, int certificateProblem) {
            return true;
        }
 }
"@
[System.Net.ServicePointManager]::CertificatePolicy = New-Object TrustAllCertsPolicy
Enable-TlsCipherSuite -Name "TLS_ECDHE_RSA_WITH_AES_256_GCM_SHA384" -Position 0
# Define the URL for the API // Replace the IP with your UTM IP.
$url = "https://172.25.105.16:4444/api/objects/network/network/"

# Define the headers for the request // Replace the Authorization Code with your UTM Code. See Swagger.
$headers = @{
    Accept = "application/json"
    Authorization = "Basic YWRtaW46U29waG9zLjE="
}

# Send a GET request to the API and store the result in a variable
$jsonResult = Invoke-RestMethod -Uri $url -Headers $headers -Method Get

# Define the subnet mask mapping
$subnetMasks = @("0.0.0.0","128.0.0.0","192.0.0.0","224.0.0.0","240.0.0.0","248.0.0.0","252.0.0.0","254.0.0.0",
                 "255.0.0.0","255.128.0.0","255.192.0.0","255.224.0.0","255.240.0.0","255.248.0.0","255.252.0.0","255.254.0.0",
                 "255.255.0.0","255.255.128.0","255.255.192.0","255.255.224.0","255.255.240.0","255.255.248.0","255.255.252.0","255.255.254.0",
                 "255.255.255.0","255.255.255.128","255.255.255.192","255.255.255.224","255.255.255.240","255.255.255.248","255.255.255.252","255.255.255.254","255.255.255.255")

# Convert the JSON data to XML
$xmlResult = [xml]@"
<?xml version="1.0" encoding="UTF-8"?>
<Configuration APIVersion="1905.1" IPS_CAT_VER="1">
$(
    foreach ($item in $jsonResult) {
        "  <IPHost>"
        "    <Name>$($item.name)</Name>"
        "    <IPFamily>IPv4</IPFamily>"
        "    <HostType>Network</HostType>"
        "    <IPAddress>$($item.address)</IPAddress>"
		"	<Subnet>$($subnetMasks[$item.netmask])</Subnet>"
        "  </IPHost>"
 }
)
</Configuration>
"@

# Save the XML data to a file in the same directory as the script
$filePath = Join-Path -Path (Split-Path -Path $MyInvocation.MyCommand.Path -Parent) -ChildPath "Entities.xml"
$xmlResult.Save($filePath)
#3 Convert REDs from UTM to SFOS:
Use this code with Cautious! RED can only be deployed with one Firewall (UTM or SFOS). If you register the RED from UTM to SFOS, iRED will start to reboot.
This code is very static and will not migrate complex RED deployments like UMTS, Transparent / Split or other scenarios. It will not migrate DHCP Servers, but will keep the IP Addresses of the REDs.
add-type @"
using System.Net;
using System.Security.Cryptography.X509Certificates;
public class TrustAllCertsPolicy : ICertificatePolicy {
    public bool CheckValidationResult(
        ServicePoint srvPoint, X509Certificate certificate,
        WebRequest request, int certificateProblem) {
            return true;
        }
 }
"@
[System.Net.ServicePointManager]::CertificatePolicy = New-Object TrustAllCertsPolicy
Enable-TlsCipherSuite -Name "TLS_ECDHE_RSA_WITH_AES_256_GCM_SHA384" -Position 0
# Define the URL for the API // Replace the IP with your UTM IP.
$url = "https://172.25.105.16:4444/api/objects/itfhw/red_server/"
$url2 = "https://172.25.105.16:4444/api/objects/interface/ethernet/"
$url3 = "https://172.25.105.16:4444/api/objects/itfparams/primary/"

# Define the headers for the request // Replace the Authorization Code with your UTM Code. See Swagger.
$headers = @{
    Accept = "application/json"
    Authorization = "Basic YWRtaW46U29waG9zLjE="
}

# Send a GET request to the API and store the result in a variable
$jsonResult = Invoke-RestMethod -Uri $url -Headers $headers -Method Get
$jsonEthernet = Invoke-RestMethod -Uri $url2 -Headers $headers -Method Get
$jsonparams = Invoke-RestMethod -Uri $url3 -Headers $headers -Method Get

#SubnetMasks
$subnetMasks = @("0.0.0.0","128.0.0.0","192.0.0.0","224.0.0.0","240.0.0.0","248.0.0.0","252.0.0.0","254.0.0.0",
                 "255.0.0.0","255.128.0.0","255.192.0.0","255.224.0.0","255.240.0.0","255.248.0.0","255.252.0.0","255.254.0.0",
                 "255.255.0.0","255.255.128.0","255.255.192.0","255.255.224.0","255.255.240.0","255.255.248.0","255.255.252.0","255.255.254.0",
                 "255.255.255.0","255.255.255.128","255.255.255.192","255.255.255.224","255.255.255.240","255.255.255.248","255.255.255.252","255.255.255.254","255.255.255.255")

# Convert the JSON data to XML
$xmlResult = [xml]@"
<?xml version="1.0" encoding="UTF-8"?>
<Configuration APIVersion="1905.1" IPS_CAT_VER="1">
$(
    foreach ($item in $jsonResult) {
	$itfmatch =  $jsonEthernet | Where-Object {$_.itfhw -eq $item._ref}
	$ip = $jsonparams | Where-Object {$_._ref -eq $itfmatch.primary_address}
	"		<REDDevice transactionid="""">"
	"		<BranchName>$($item.name)</BranchName>"
	"		<Device>$($item.type)</Device>"
	"		<REDDeviceID>$($item.red_id)</REDDeviceID>"
	"		<TunnelID>Automatic</TunnelID>"
	"		<REDMTU>1500</REDMTU>"
	"		<Description>$($item.comment)</Description>"
	"		<NetworkSetting>"
	"			<Zone>LAN</Zone>"
    "           <DhcpStatus>Disable</DhcpStatus>"
	"			<TunnelCompression>Disable</TunnelCompression>"
	"			<OperationMode>Standard</OperationMode>"
	"			<IPAddress>$($ip.address)</IPAddress>"
	"			<NetMask>$($subnetMasks[$ip.netmask])</NetMask>"
	"			<MACFilter>"
	"		<FilterType>None</FilterType>"
	"			</MACFilter>"
	"		</NetworkSetting>"
	"		<Authorized>1</Authorized>"
	"		<UnlockCode>$($item.unlock_code)</UnlockCode>"
	"		<UTMHostName>$($item.hub_hostname)</UTMHostName>"
	"		<SecondUTMHostName>$($item.hub2_hostname)</SecondUTMHostName>"
	"		<Use2ndIPHostNameFor>Failover</Use2ndIPHostNameFor>"
	"		<DeploymentMode>AutoDeployment</DeploymentMode>"
	"		<UplinkSettings>"
	"			<Uplink>"
	"			<Connection>DHCP</Connection>"
	"			</Uplink>"
	"			<UMTS3GFailover>Disable</UMTS3GFailover>"
	"		</UplinkSettings>"
	"		</REDDevice>"
 }
)
</Configuration>
"@

# Save the XML data to a file in the same directory as the script
$filePath = Join-Path -Path (Split-Path -Path $MyInvocation.MyCommand.Path -Parent) -ChildPath "Entities.xml"
$xmlResult.Save($filePath)
Important Note: The code will generate XML Files for SFOSv19.5. If you want to use the XML in a older version of SFOS, adjust the following line:
<Configuration APIVersion="1905.1" IPS_CAT_VER="1">
Feel free to contribute more code for migration scenarios. We will provide more code in the future.
Edited Tags
[edited by: Raphael Alganes at 12:24 AM (GMT -7) on 13 Apr 2023]

