

Disclaimer: This information is provided as-is for the benefit of the Community. Please contact Sophos Professional Services if you require assistance with your specific environment.
Overview
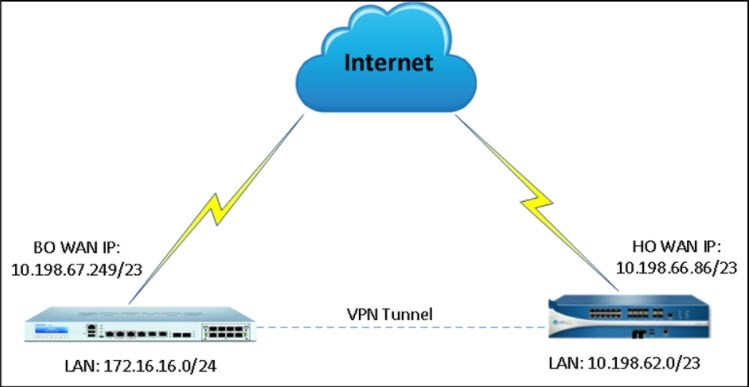
This article describes how to set up a site-to-site IPsec VPN connection between a Sophos Firewall and a Palo Alto firewall using a pre-shared key to authenticate VPN peers.
Table of Contents
Applies to the following Sophos products and versions
Sophos Firewall
Prerequisites
- You must have read-write permissions on the SFOS Admin Console and the Palo Alto Web Admin Console for the relevant features.
- Palo Alto firewall must have at least two interfaces in Layer 3 mode.
Network diagram
Configuration
Palo Alto Firewall
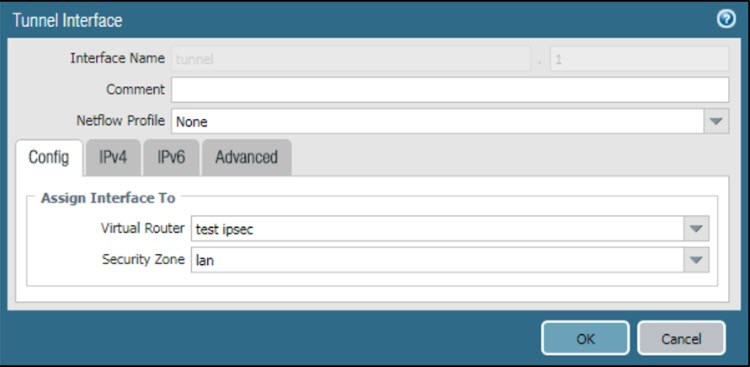
Create tunnel interface
- Go to Network > Interface > Tunnel and click Add.
- Enter Interface Name.
- Select existing Virtual Router.
- For Security Zone, select layer 3 internal zone from which traffic will originate.
Configure IKE Gateway: Phase 1 parameters
- Go to Network Profiles > IKE Crypto > PA_IKE Crypto.
- In IKE Crypto Profile, add group5 to DH Group, aes-256-cbc to Encryption, and sha1 to Authentication.
- Enter Seconds in Key Lifetime and 28800 as Lifetime.
- Set IKEv2 Authentication Multiple to 0.
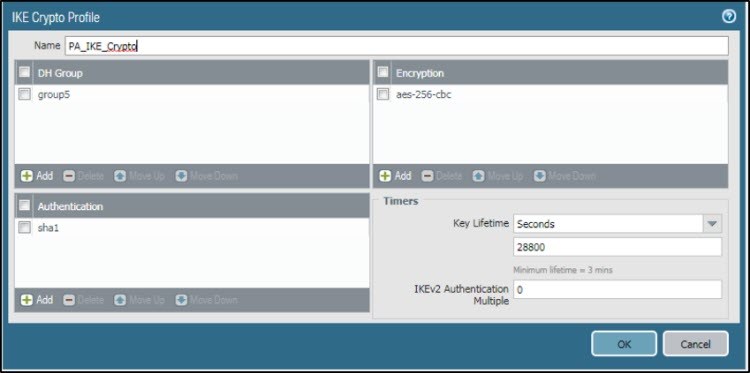
- Click OK.
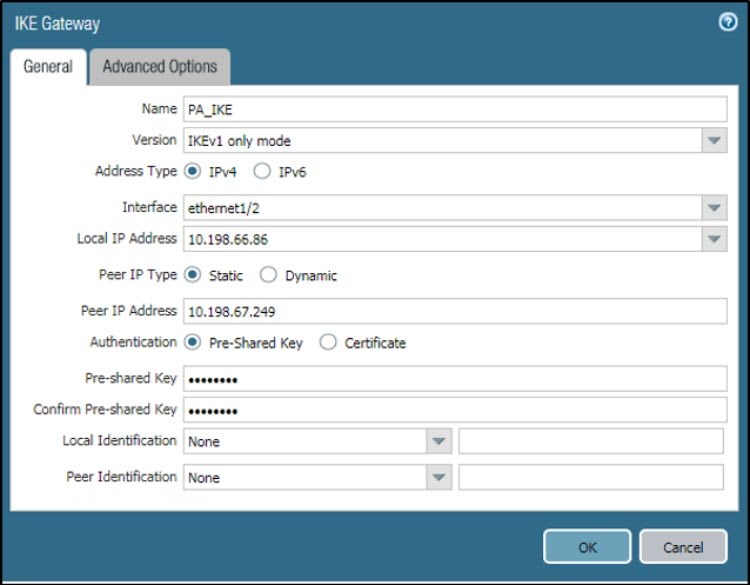
To add PA_IKE_Crypto profile to IKE gateway:
- Go to Network > IKE Gateway > General and create a new gateway.
- Enter Name.
- Set Version to IKEv1 only mode.
- Set Address Type to IPv4.
- Set Interface to ethernet1/2, and Local IP Address to 10.198.66.86.
- Set Peer IP Type to Static.
- For Peer IP Address, enter 10.198.67.249.
- Set Authentication to Pre-Shared Key.
- Click OK.
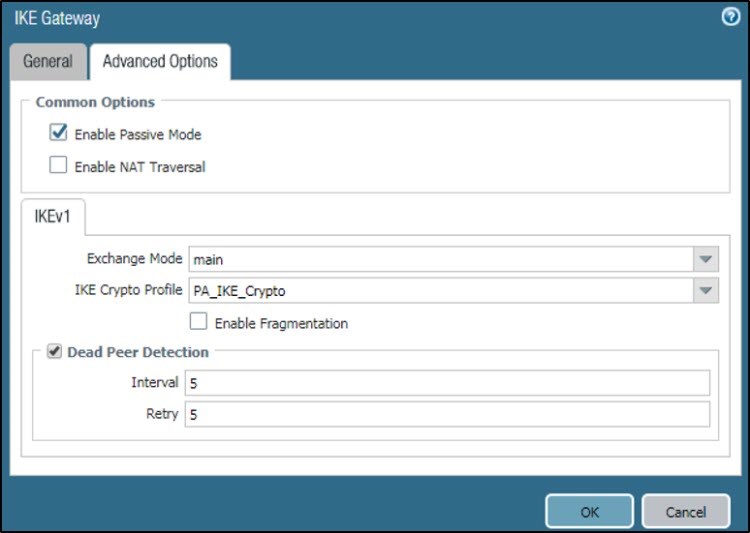
- Go to Network > IKE Gateway > Advanced Options.
- Under Common Options, select Enable Passive Mode, since Palo Alto will act as the responder for the IPsec connection.
- Under IKEv1, set Exchange Mode to main, and IKE Crypto Profile to PA_IKE_Crypto, which you have created.
- Select Dead Peer Detection. Set Interval and Retry to 5.
- Click OK.
Configure IPsec Phase 2 parameters
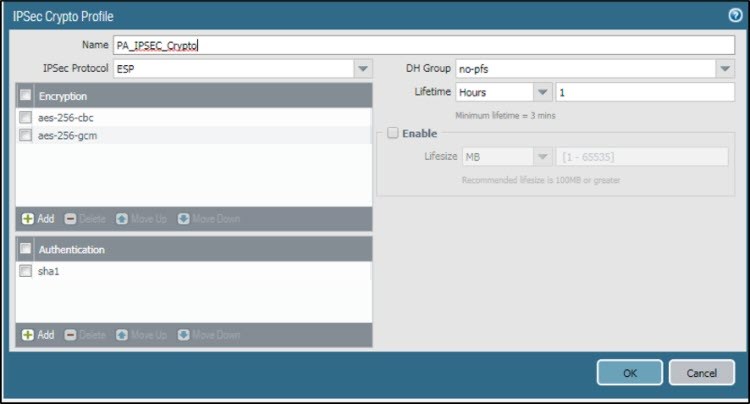
- Go to Network > IPsec Crypto and create a profile.
- Enter Name.
- Set IPSec Protocol to ESP, and DH Group to no-pfs.
- Add aes-256-cbc and aes-256-gcm to Encryption.
- Add sha1 to Authentication.
- Set Lifetime to Hours and enter 1.
- Click OK.
Define Monitor Profile
- Go to Network Profile > Monitor Profile.
- Enter Name.
- Set Action to Wait Recover.
- Enter the following values:
- Interval (sec): 3
- Threshold: 5
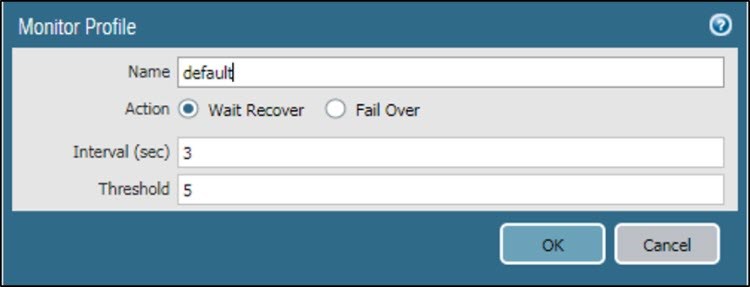
- Click OK.
Configure IPsec VPN Tunnel
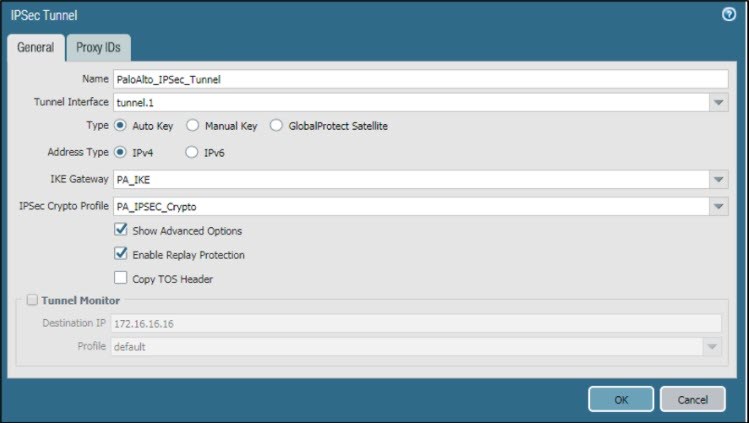
- Go to Network > IPSec Tunnel > General.
- Enter Name.
- Select the Tunnel Interface that was created in Create tunnel interface.
- Set Type to Auto Key and Address Type to IPv4.
- Set IKE Gateway to PA_IKE and IPSec Crypto Profile to PA_IPSEC_Crypto, which was created.
- Select Show Advanced Options and Enable Replay Protection.
- Click OK.
To Add Proxy ID:
Go to Network > IPSec Tunnel > Proxy IDs and configure the local and remote subnets for Head Office (HO) and Branch Office (BO).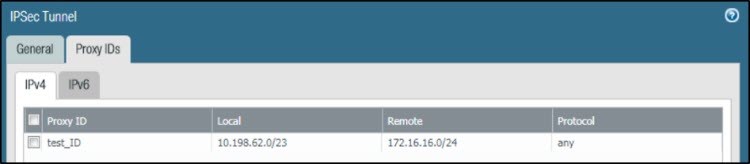
Create route for VPN traffic
- Go to Virtual Router > Static Route > IPv4.
- Enter Name.
- For Destination, enter 172.16.16.0/24.
- Set Interface to tunnel.1, and Next Hop to None.
- For Metric, enter 10.
- Set Route Table to Unicast.
- Click OK.
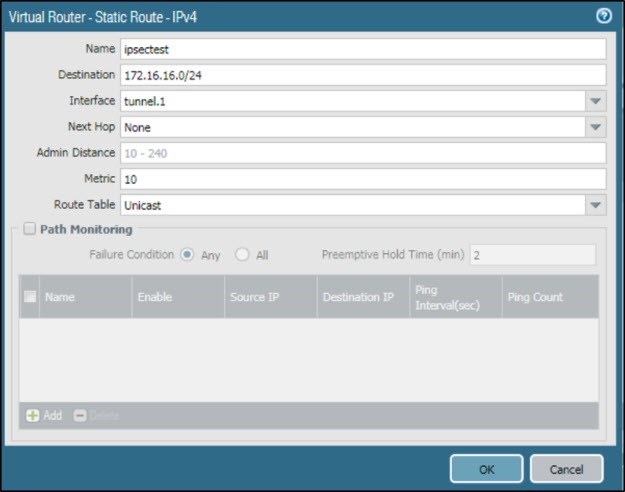
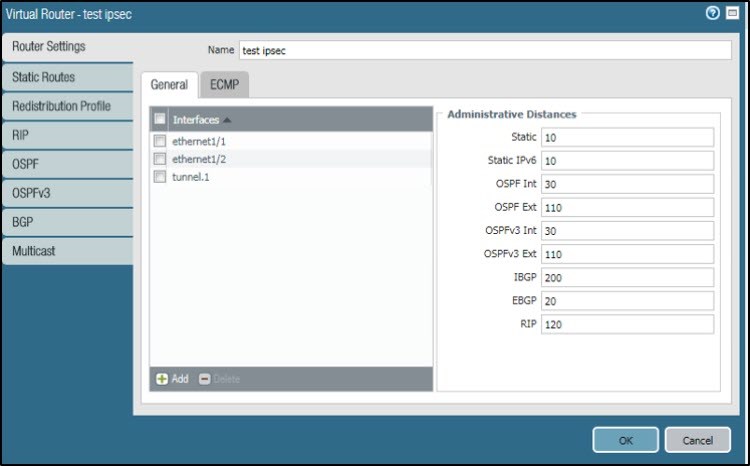
- Add tunnel interface in Virtual Router.
Create a firewall rule to allow VPN traffic
- Go to Policies > Security and create a firewall rule.

Sophos Firewall
Create IPsec VPN Policy for Phase 1 and Phase 2
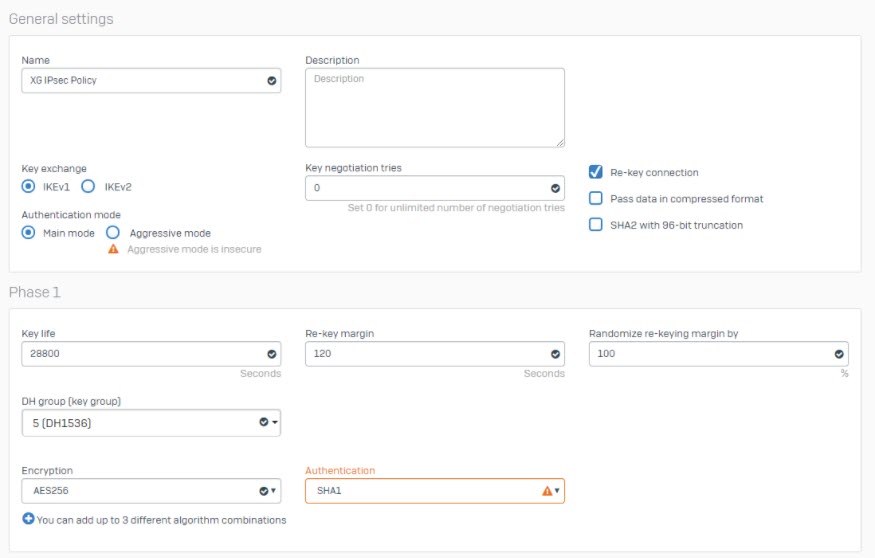
- Go to Configure > VPN > IPsec policies and click Add./ For Version 19.Go to System>Profile>IPsec Profiles>and click Add
- Enter Name.
- Set Key exchange to IKEv1 and Authentication mode to Main mode.
- Set Key negotiation tries to 0.
- Select Re-key connection.
- Under Phase 1, set Key life to 28800, Re-key margin to 120, and Randomize re-keying margin by to 100.
- Set DH group (key group) to 5 (DH1536).
- Set Encryption to AES256 and Authentication to SHA1.
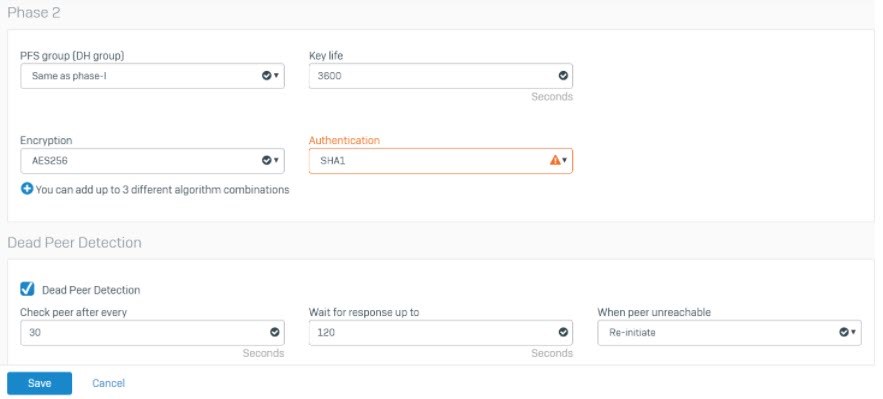
- Under Phase 2, set PFS group (DH group) to Same as phase-I, and Key life to 3600.
- Set Encryption to AES256 and Authentication to SHA1.
- Under Dead Peer Detection, set Check peer after every to 30 seconds and Wait for response up to as 120 seconds.
- Set When peer unreachable to Re-initiate.
- Click Save.
- You have created the following IPsec VPN policy.

Configure IPsec connection
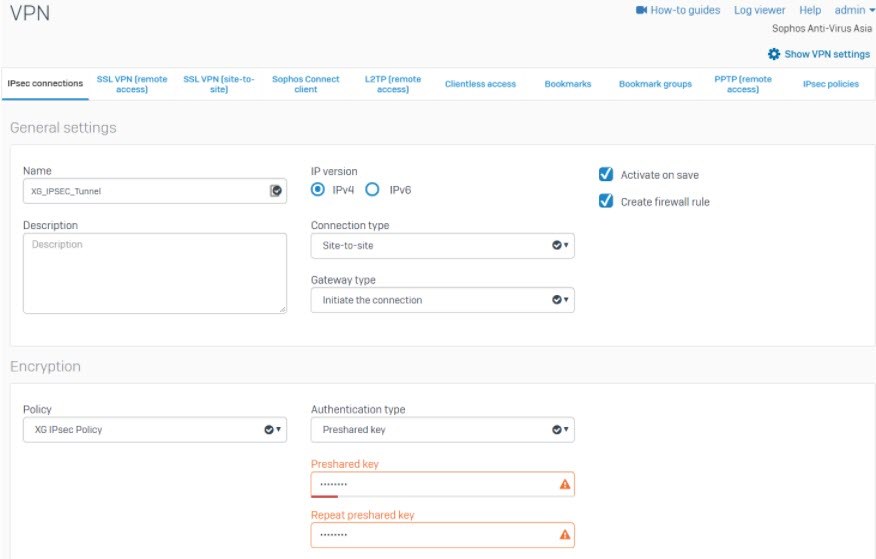
- Go to Configure > VPN > IPsec connections and click Add./For Version 19. Go to Configure >Site-to-Site VPN>IPsec and click Add
- Under General settings, enter Name.
- For IP version, select IPv4.
- Select Activate on save and Create firewall rule.
- Set Connection type to Site-to-site and Gateway type to Initiate the connection.
- Under Encryption, set Policy to XG IPsec Policy, which you have created.
- Set Authentication type to Preshared key. Enter and repeat the Preshared key.
- Under Gateway settings > Local gateway, set Listening interface to PortB – 10.198.67.249 and Local ID type to Select local ID.
- Under Local subnet, add the XG_Network.
- Under Remote gateway, set Gateway address to 10.198.66.86 and Remote ID type to Select remote ID.
- Under Remote subnet, add the Palo_Alto Network.
- Click Save.
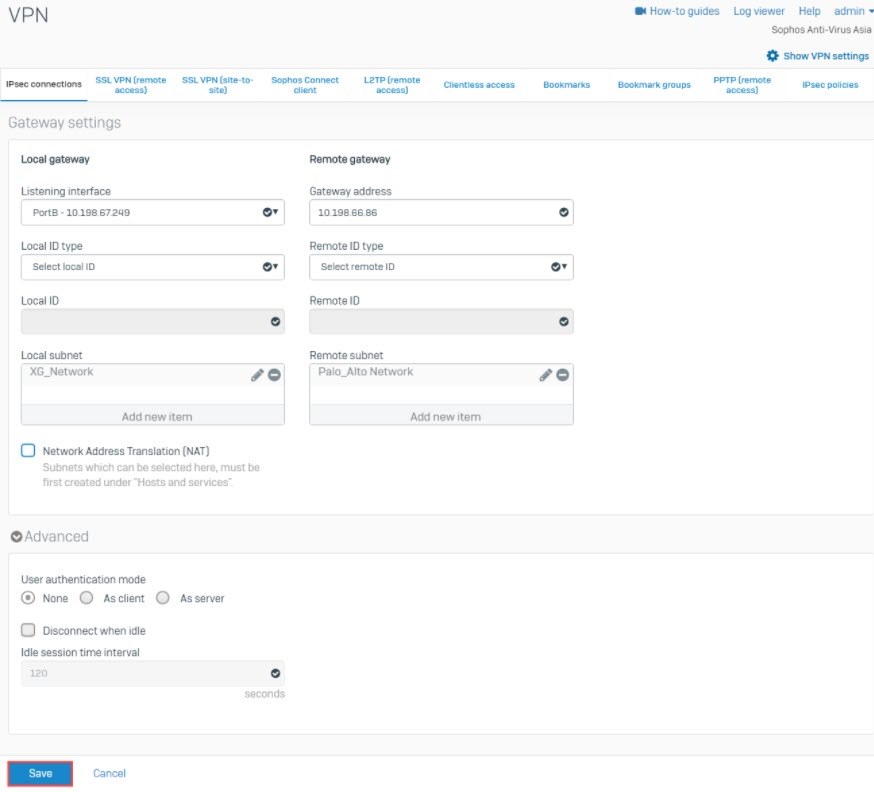
- The IPsec connection is automatically activated and an automatic firewall rule is also created.
Activate IPsec connection
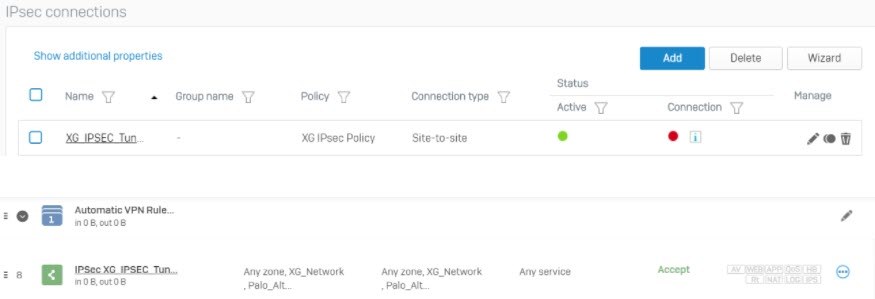
- Go to Configure > VPN > IPsec connections.
- Under Status, click the
 under Connection to establish the connection.
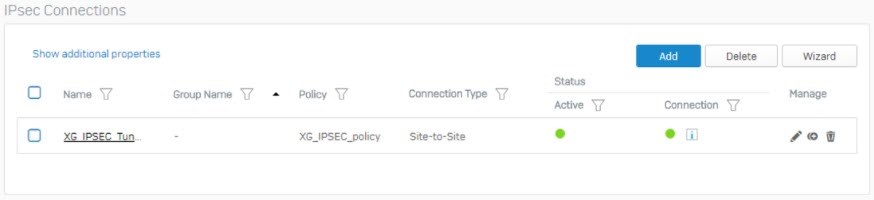
Sign up to the Sophos Support Notification Service to get the latest product release information and critical issues.
Updated Disclaimer
[edited by: Erick Jan at 1:21 PM (GMT -7) on 17 Apr 2023]
