

Disclaimer: This information is provided as-is for the benefit of the Community. Please contact Sophos Professional Services if you require assistance with your specific environment.
Also check out Sophos Firewall AA (Active-Active) deployment with Amazon Transit Gateway (TGW) in AWS!
Introduction
In this document, we'll be talking about how to deploy the Sophos firewall in HA (High Availability) mode a.k.a. Active-Passive mode on the AWS platform. We will be using the Amazon transit gateway (TGW) feature to support the Hub and Spoke model for this deployment.
Overview
The transit gateway is used to facilitate node redundancy for the Sophos Firewalls and BGP is used to communicate the routing information with the rest of the AWS infrastructure in the customer account.
If you are interested and want to know more about this technology, check out the Amazon's documentation on Transit gateway: https://aws.amazon.com/transit-gateway/
Sophos Firewall is available from the AWS marketplace for both High Availability and Fault Tolerance methods of deployment, however in this document we will be focusing on High Availability deployment method.
It is recommended to deploy the Sophos Firewall nodes in a separate VPC for the traffic management and routing purposes.
While it is certainly possible to deploy the firewalls into the same VPC as other backend workloads, it will require different instructions for the TGW attachment and route table creation. Hence feel free to contact your Sophos account representative if your setup requires a single VPC deployment.
Prerequisites
- A valid AWS account to deploy Sophos Firewall.
- Also make sure that the Transit Gateway Connect feature is available in the required AWS region and you can confirm the same from the AWS FAQ document link: https://aws.amazon.com/transit-gateway/faqs
Network diagram
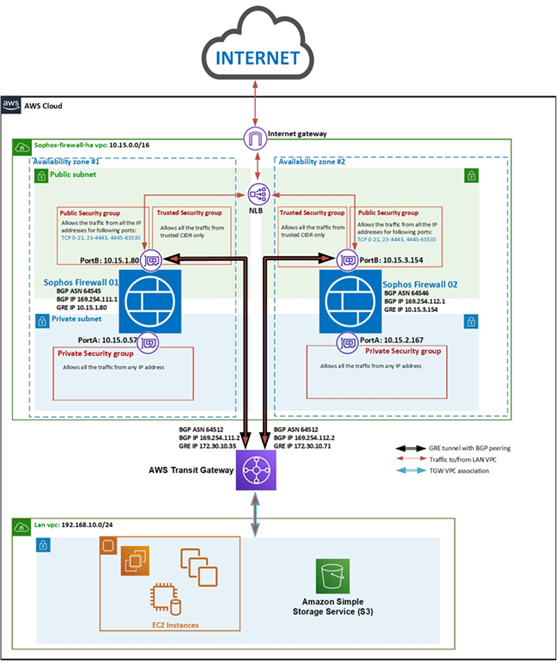
Here is the network diagram that we are considering for this deployment. Both the Sophos firewall instances will be deployed in a separate VPC, having connectivity with the LAN network VPC via the transit gateway.
Note: The IP addresses used in this setup and document are for demo purpose. You can always use other IP addresses in your deployment scenario.
Configuration steps in AWS console
Sophos Firewall instances deployment
- (Optional, if you already have key pair created in your account) Once you have logged into your AWS web console, click on Services > EC2 and scroll down all the way to click on Key Pairs.
Click on Create Key pair button, enter an appropriate name, select ppk and finally click on the Create key pair button so that the private key gets automatically downloaded to your computer which can be later used to access the Sophos firewall instance via SSH.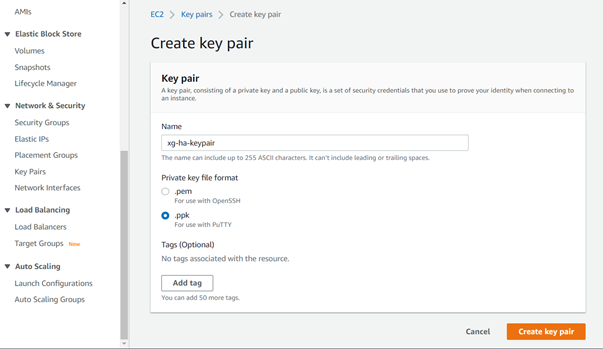
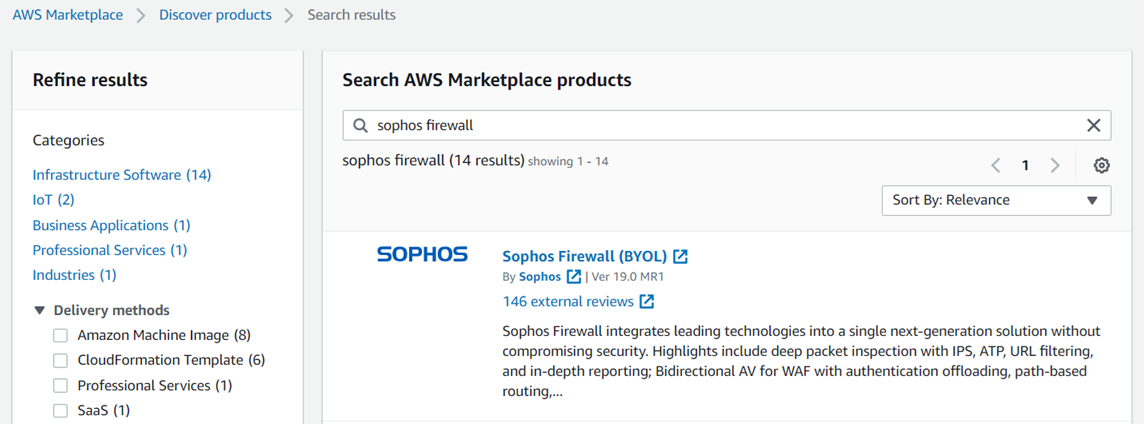
- Click on Services > AWS Marketplace Subscriptions > Discover Products and search for Sophos Firewall. In this document, we will select the BYOL deployment option.
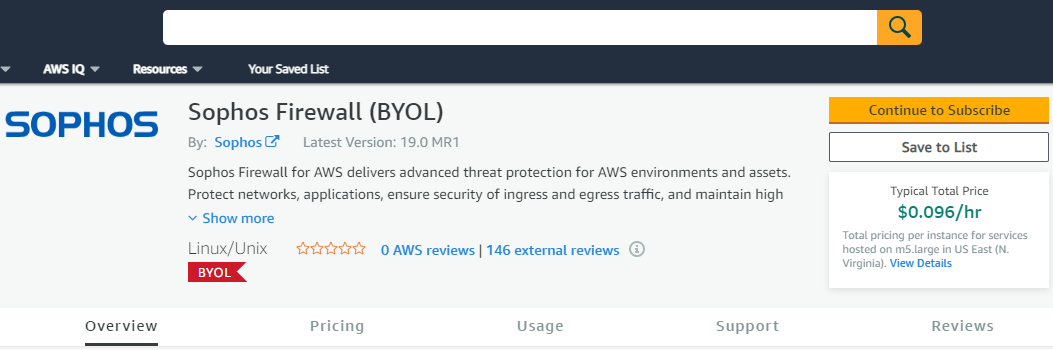
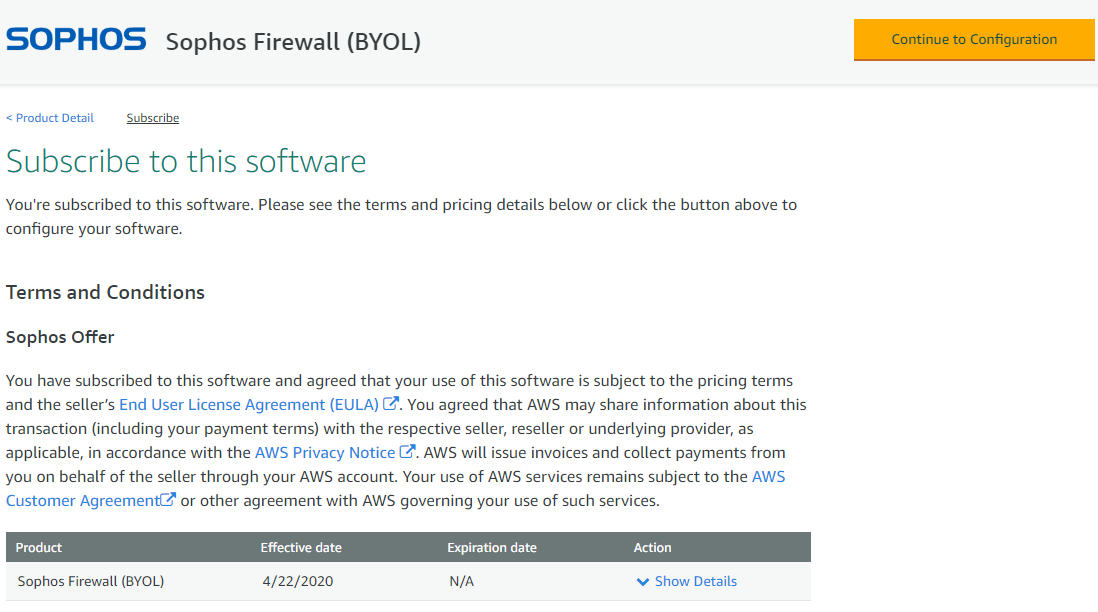
- You may go through the Overview section and then click on Continue to subscribe button.
- Make sure to read the End Users License Agreement, Privacy policy and AWS customer agreement and if you agree to those terms and conditions, click on Continue to configuration button.
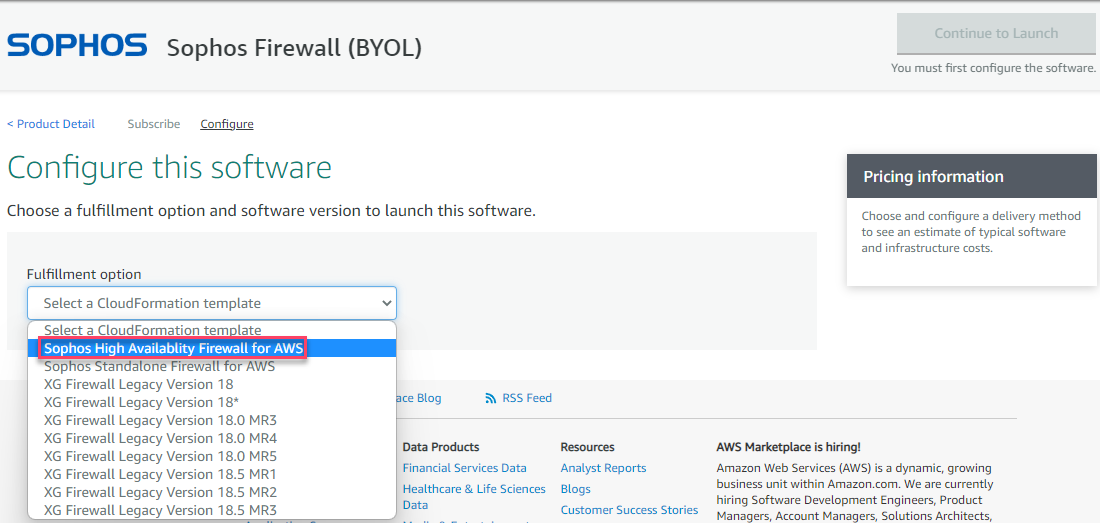
- Select Sophos High Availability Firewall for AWS and the latest available software version, the required region of deployment and then click on Continue to Launch.
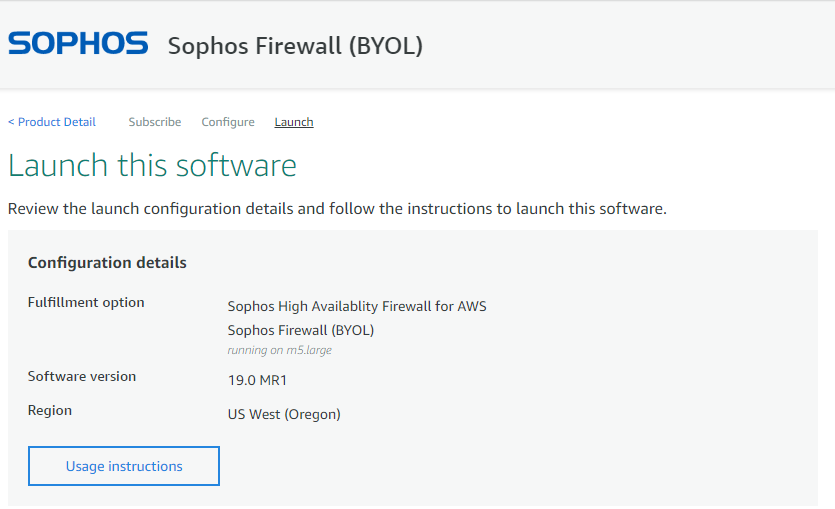
- Select the action as Lauch Cloudformation and finally click on Launch button.
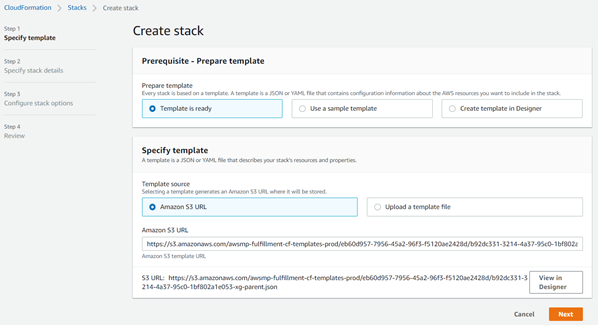
- It will redirect to the Cloudformation service webpage. Keep the settings as-is and click on Next.
- Enter an appropriate stack name, keep the AMI ID as autodetect and select the required instance size from the drop-down list.

- Select Availability zones for each firewall node and make sure that both have different AZs selected to achieve High Availability.
Configure the network address for the new VPC. You just need to enter the first two octet of the network IP. We will use the default network address 10.15 in this deployment.
Enter the public IP address of the administrator deploying this firewall in the Trusted network CIDR section. This IP address will have full management access (SSH and Web Console) to both the Sophos Firewall units.
Enter a desired BGP ASN to represent the Amazon Transit Gateway in the communication with firewall (default value is 64512, doesn't need to be changed unless this ASN is already used somewhere in your BGP setup).
BYOL and PAYG is available in the Pricing option. We will select BYOL for the demonstration purpose in this article.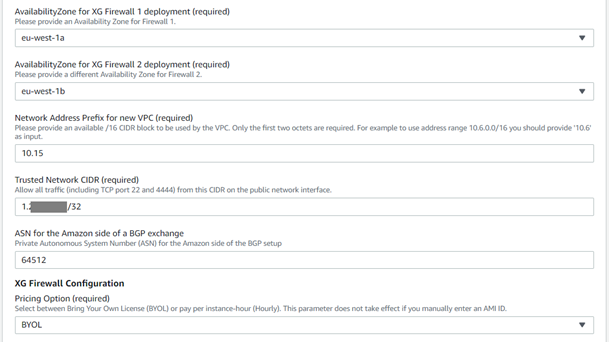
- If you selected the BYOL in the previous step and have already purchased a license from a Sophos partner, you may enter the serial numbers of your registered licenses in the ‘Sophos License Serial Number for Sophos Firewalls field in a comma-separated format (for example 123456789,23467890).
Alternatively, you may leave this field as empty.
For the demonstration purpose in this article, we will enter the serial numbers of both the Sophos Firewall devices.
Enter the admin password of your choice matching with the password complexity policy for the remote access of firewall instances.
Then select the SSH keypair that was created previously in step #1.
Enter "yes" in the End User License Agreement field after reading and agreeing to the terms and conditions of Sophos EULA and privacy policy.
Now, if you wish to opt for the customer experience improvement program, you can select "on" option from the dropdown menu or select the ‘off’ option. We will select On and click on Next.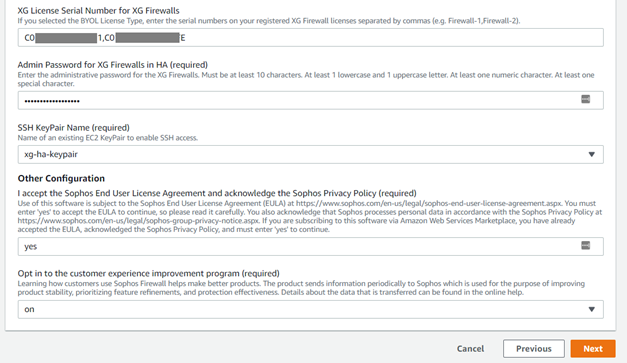
- Optionally, you can add Tags for this deployment or leave the fields as-is.
Note: There is no need to add the ‘Name’ tag in the Tags section because, by default, the CloudFormation stack name is appended as the name for some of the AWS resources and components such as Transit gateway, VPC, Subnets, EC2 instances and Load balancer.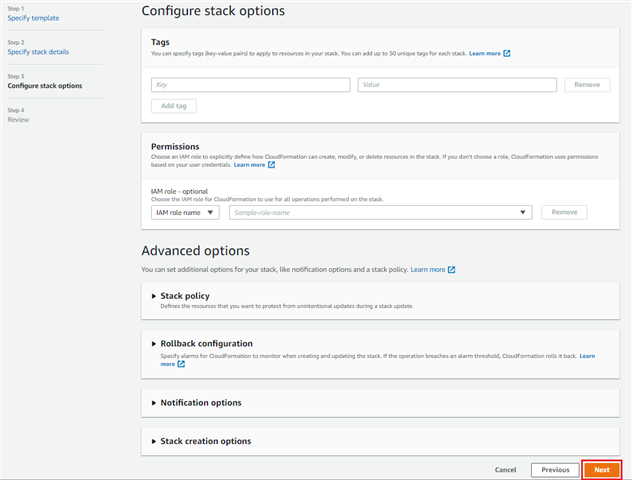
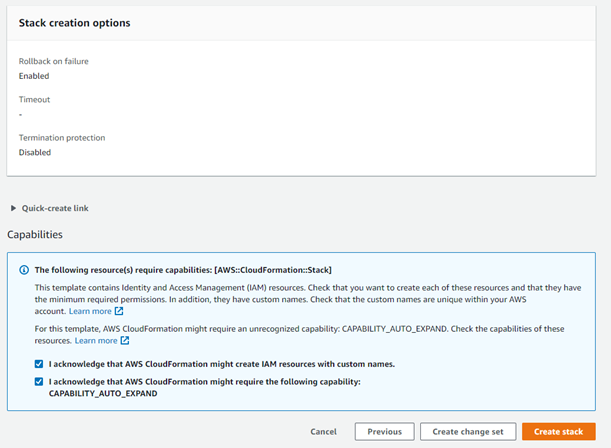
- Read through the deployment configuration summary, then enable the checkboxes for allowing IAM resources creation with custom names and CloudFormation CAPABILITY_AUTO_EXPAND permission and finally click on Create Stack button
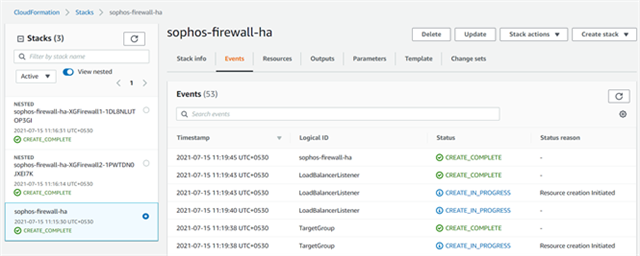
- It will show the progress of the stack deployment for both the firewall instances and the resources associated with it. After a few minutes it will show the status as Create Complete which means that both the firewall instances have been deployed successfully.
AWS Transit Gateway configuration steps
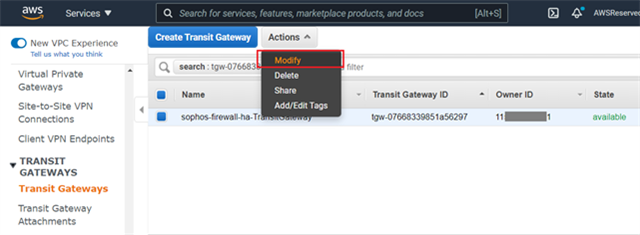
- Navigate to Services > VPC and scroll down all the way to Transit Gateways section and click on Transit Gateways. Select the transit gateway configured by the CloudFormation stack and from the Actions section click on Modify.
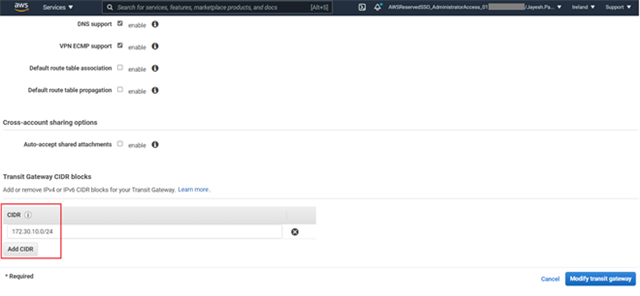
- For the Transit gateway CIDR blocks click on Add CIDR button and enter a suitable IPv4 network range with a /24 or larger CIDR block that you wish to use for the GRE tunnels between the Sophos firewall nodes and the Transit gateway. Click Modify transit gateway to save the changes.
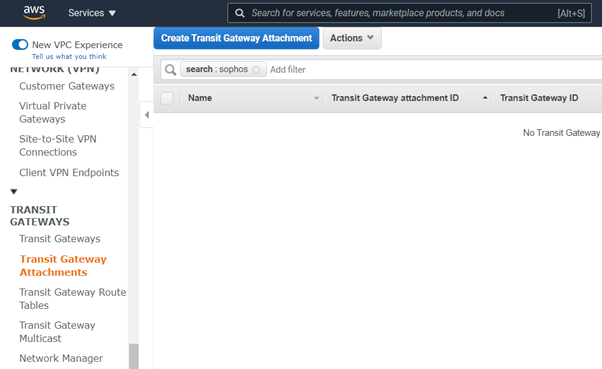
- Navigate to Transit Gateway Attachments and click Create Transit Gateway Attachment.
- Select the correct transit gateway from the dropdown menu and make sure that VPC is selected as the Attachment type.
Enter a name that will help you recognize the connection in the Attachment Name tag field.
Select the Sophos Firewalls’ VPC from the VPC ID dropdown menu and make sure to select the public facing subnets of both the firewall nodes in the Subnet IDs section.
Click Create attachment to complete this transit gateway attachment creation process.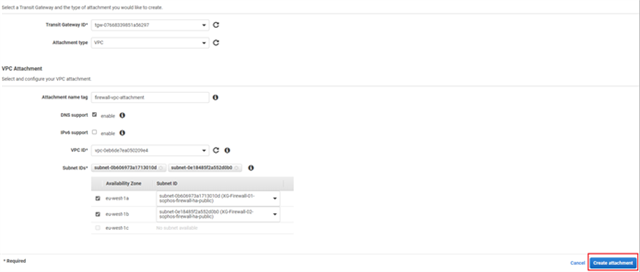
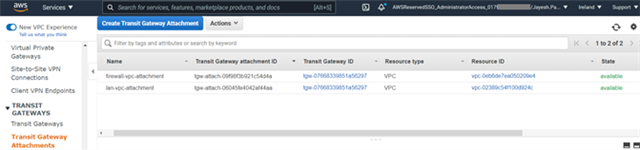
- Similarly, create the Transit gateway attachments for LAN VPC and any other VPC also that needs the connectivity with the Sophos Firewall instances via the AWS Transit gateway service.
- After all the transit gateway attachments have been created for the required VPCs, click Create Transit Gateway Attachment and select the same transit gateway ID.
Make sure to select the Attachment type as Connect.
Enter a name that will help you recognize the connection in the Attachment Name tag field.
Select the Sophos Firewalls’ local VPC from the Transport Attachment ID dropdown menu and Click Create attachment to complete creating the attachment.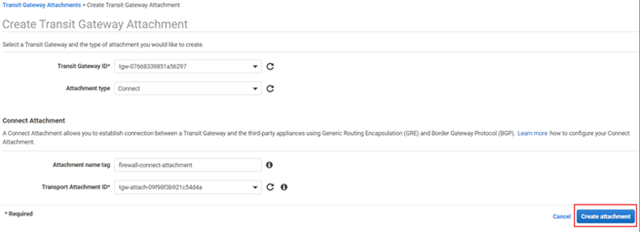
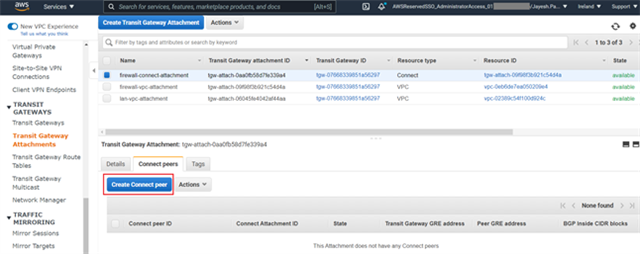
- Select the newly created Connect attachment from the list, navigate to the Connect peers tab and click Create connect peer.
- Enter an appropriate name in the Name tag field and keep the Transit Gateway GRE address as Auto generated unless you wish to use a specific IP address in the CIDR block we previously attached to this transit gateway.
Enter the WAN network adapter IP address of Sophos Firewall 01 in the Peer GRE address field.
Set the IPv4 subnet you want to use inside the GRE tunnel by entering it in the BGP Inside CIDR blocks IPv4 field.
Note: This block needs to be exactly /29 large and part of the non-excluded sections of the 169.254.0.0/16 subnet. For more details, see: https://docs.aws.amazon.com/vpc/latest/tgw/tgw-connect.html
Peer ASN as the Sophos firewall's ASN used for BGP peering and finally click on Create. This will be configured in BGP section of Sophos firewall later.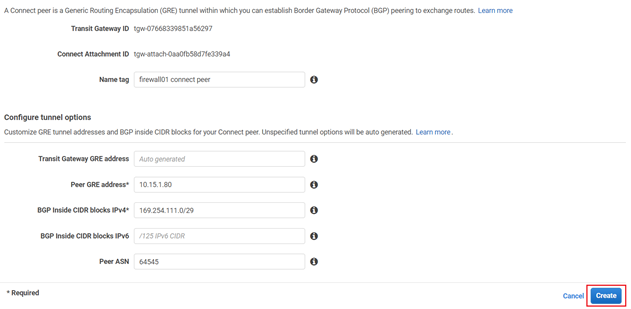
- Create Connect peer for Sophos Firewall 02 by following the same steps as mentioned in step #8.
Ensure that the Peer ASN value is higher than the value entered for Sophos firewall 01, so that it will be implemented as a High Availability solution.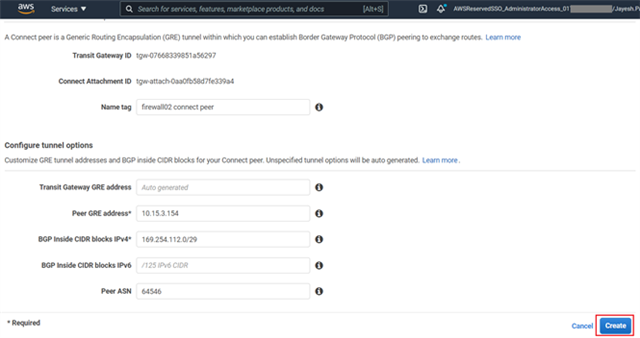
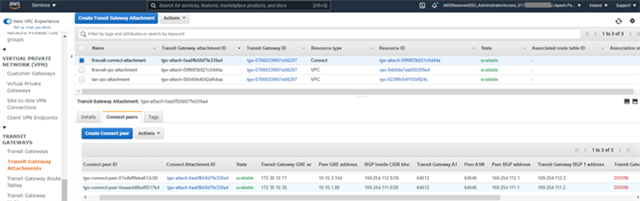
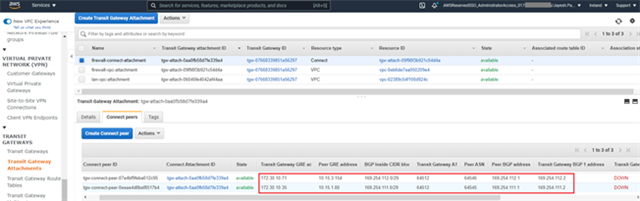
- After both the connect peers have been configured, it will show the GRE and BGP related details which can be used later as a reference while configuring GRE tunel and BGP peering in both the Sophos firewall nodes.
- Navigate to Transit Gateway Route Tables and click Create Transit Gateway Route Table to create a new table.
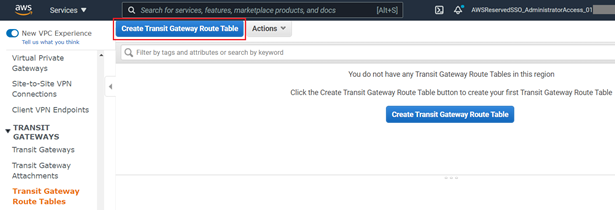
Enter a name for the table in the Name tag field and select the Transit Gateway used for the attachments earlier from the Transit Gateway ID dropdown menu and click Create Transit Gateway Route Table.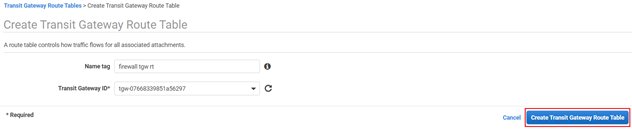
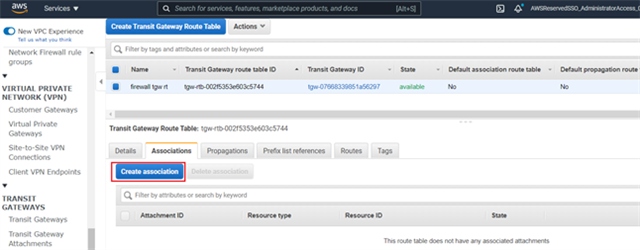
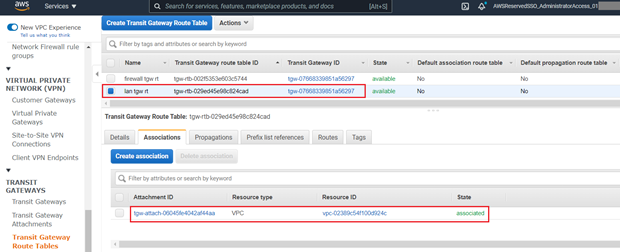
- Select the Transit Gateway Route Table from the list and navigate to the Associations tab and click Create association.
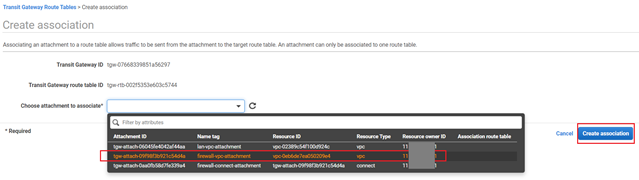
- Select the VPC attachment for the Sophos Firewall created in step # 4 and click Create association.
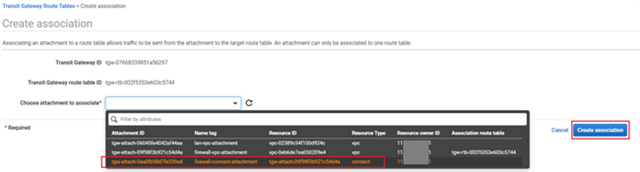
- Similarly create another association and select firewall’s connect attachment created previously in step #6.
- (Optional) To enable the Sophos Firewall to receive routing information from other VPCs, IPsec tunnels and Connect tunnels, you will need to add them on the "Propagations" tab:
- Navigate to the Propagations tab.
- Click Create propagation.
- Select the relevant VPC, VPN or Connect tunnel from the Choose attachment to propagate dropdown menu.
- Click Create propagation to complete propagation creation.
Repeat the above sub-steps for each additional attachment you wish to propagate to the Sophos Firewall via TGW.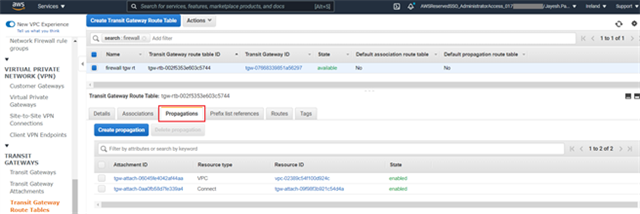
- (Optional) To enable other VPCs, VPN and Connect tunnels to receive routing information from the Sophos Firewall you will need to:
- Repeat steps 12-15, selecting the remote LAN VPC instead of the Firewall's VPC in step 13.
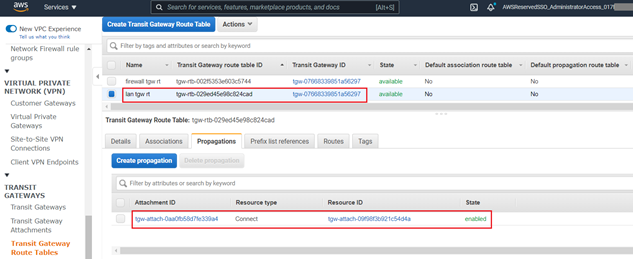
- Navigate to the Propagations tab on the newly created Route Table.
- Click Create propagation.
- Select the firewall Connect tunnel from the Choose attachment to propagate dropdown menu and click Create propagation to complete propagation creation.
- Repeat steps 12-15, selecting the remote LAN VPC instead of the Firewall's VPC in step 13.
- Navigate to the Virtual Private Cloud in the left-hand menu and select Route Tables.
Locate the route table associated with the Sophos Firewalls' WAN subnet
(This information can be found by selecting a route table associated with the firewall's VPC and checking the Subnet Associations tab).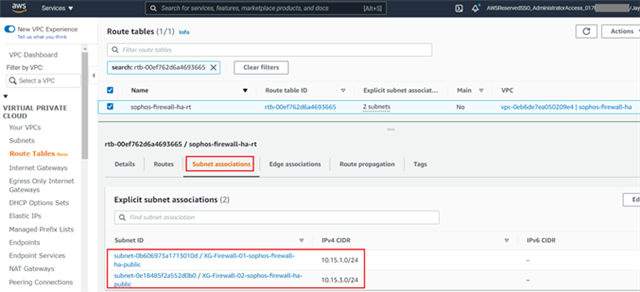
- Click on the Routes tab and then click Edit routes.
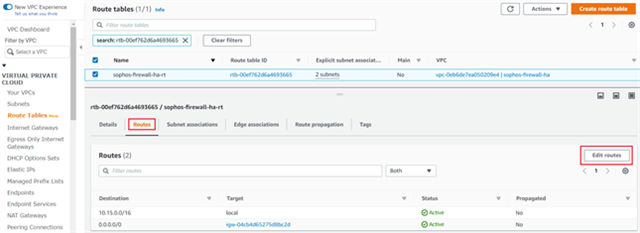
- Click Add route and enter the Transit gateway CIDR configured in step 2.
Select the TGW created by CloudFormation in the Target list and click Save changes.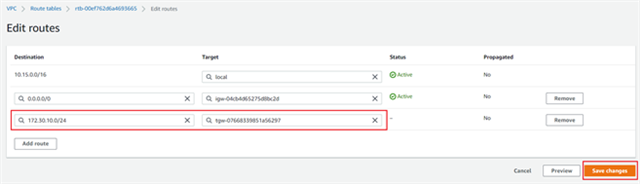
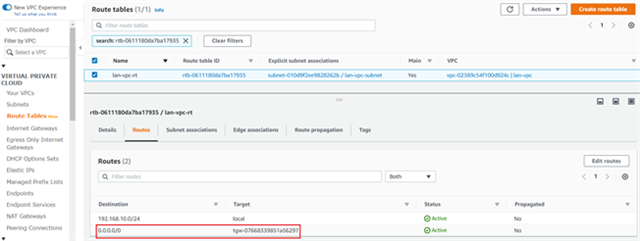
- (Optional) In order to force other subnets to route their traffic through the TGW, you will need to edit their subnet route tables to send relevant traffic to the gateway. To do so:
- Locate the relevant route table.
- Open the Routes tab and click Edit routes.
- Click Add route and enter 0.0.0.0/0 as the subnet value (this scenario assumes that all traffic needs to be sent to the TGW to enable additional filtering. Use a specific subnet range if this is not the case for your setup).
- Select the TGW created by CloudFormation in the previous section from the Target list.
- Click Save routes to store the route table.
- With the new Connect configurations created, the next step is to configure the Sophos Firewall nodes with the relevant GRE and BGP details.
- In your AWS console, navigate to Services > VPC.
- Navigate to Transit Gateway Attachments in the left-hand menu.
- Select the Connect attachment for the Sophos Firewall node and navigate to the Connect peers tab.
- Note the address information in the following fields for both the entries that will be required to configure the Sophos firewall nodes:
- Transit Gateway GRE address.
- Peer BGP address.
- Transit Gateway BGP 1 address.
Configuration steps in Sophos Firewall
- In AWS console, navigate to Services > EC2 and click on Instances.
- Select the first Sophos firewall and copy the Elastic public IP address of the instance.
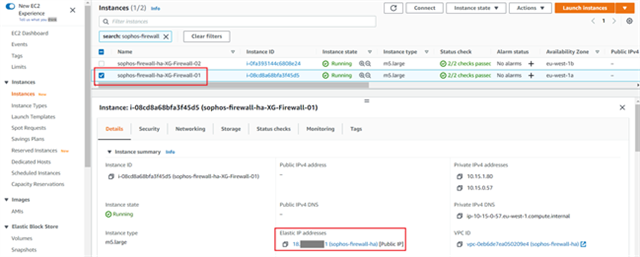
- Open a new web browser tab and access the web console of the first firewall on HTTPS using the public IP copied in Step 2 and append the port number 4444.
Enter the admin credentials and captcha and click on Login.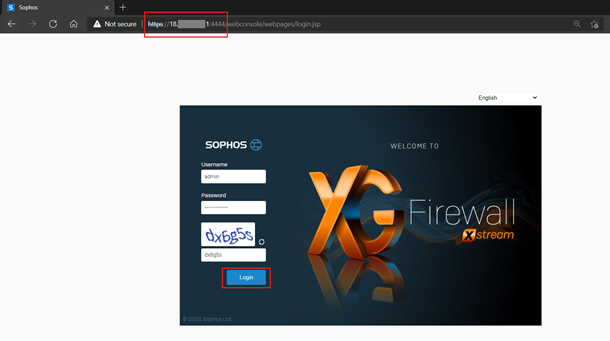
Note: If the web console screen shows you the initial wizard setup page for registration, then you need to register the firewall node first.
Please follow the steps mentioned in the following article or watch the how-to video of registration and basic setup to complete this process.
KBA: https://support.sophos.com/support/s/article/KB-000035575?language=en_US
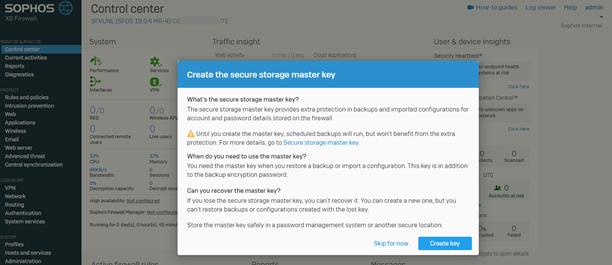
How-to video:https://techvids.sophos.com/watch/uBDMZovVKXTykv3rQjxCsp - After logging in, it might show a pop-up window to set the secure storage master key that is basically used to store important information in encrypted format. You can set a key or skip that configuration.
- Navigate to CONFIGURE > Routing > BGP.
Enter the Sophos Firewall's WAN adapter IP address in the Router ID field.
Enter the BGP Autonomous System number entered in step 8 of the previous section into the Local AS field.
Click Apply and accept the warning message.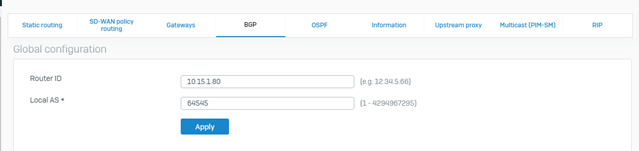
- Navigate to the Neighbors section and click Add.
Enter the IP address listed under Transit Gateway BGP 1 address from step IV into the IPv4 address field.
Enter the Remote AS as the ASN used by the Transit Gateway (entered in step 9 of the CloudFormation instructions).
Click Save to store the neighbor settings.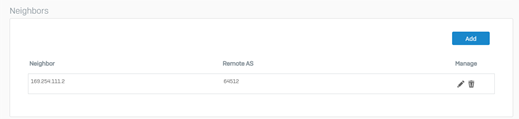
- Navigate to the Networks section and click Add.
Enter 0.0.0.0 in the "IPv4/netmask" field and select "/0 (0.0.0.0)" from the dropdown.
Click Save to store the BGP network advertisement.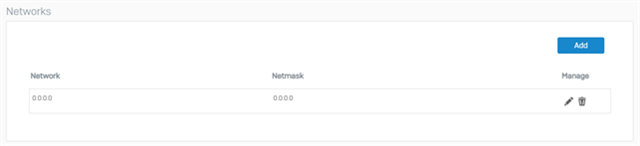
Note: This assumes all traffic originating from VPCs that receive the firewall’s route through the TGW propagation will be routed through the Sophos Firewall. If you wish to be more selective, enter the specific subnet (or subnets, repeating this step for each subnet) and netmask for your setup. - Navigate to PROTECT > Rules and policies > Firewall rules and make sure to create relevant firewall rules with action Allow, so that the traffic can traverse successfully via the Sophos firewall.

- Set up a remote shell session of SSH with the Sophos Firewall via the elastic public IP (copied in step 2) and sign in using the admin username and its password.
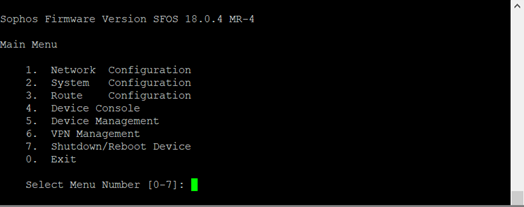
- Select option 4. Device console.
Enter the following command (replacing the sections between <> with the details found in step IV):"system gre tunnel add name TGW01 local-gw PortB remote-gw <Transit Gateway GRE address> local-ip <Peer BGP address> remote-ip <Transit Gateway BGP 1 address>"

After the command is executed successfully, type exit to return to the main menu. - Select option 3. Route Configuration, followed by 1. Configure Unicast Routing and 3. Configure BGP.
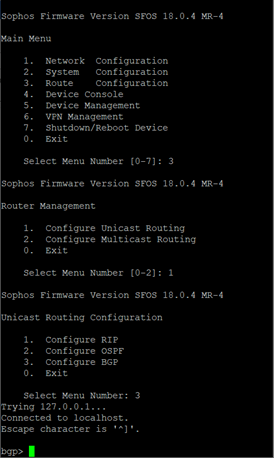
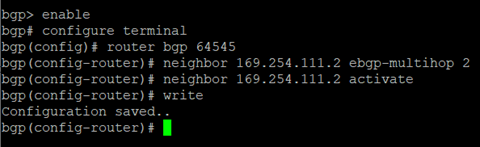
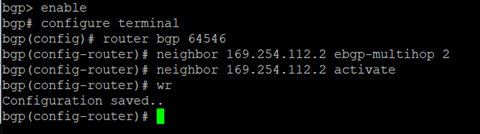
Enter the following commands to enable BGP multihop (replacing the filed between <> with details from step IV of previous section and step 5 of this section respectively):bgp> enable bgp# configure terminal bgp(config)# router bgp <This Firewall's ASN> bgp(config-router)# neighbor <Transit Gateway BGP 1 IP> ebgp-multihop 2 bgp(config-router)# neighbor <Transit Gateway BGP 1 IP> activate bgp(config-router)#write
- Type exit to return to the previous configuration level. Repeat until you return to the main menu.
Select 0. Exit and repeat until the SSH session is closed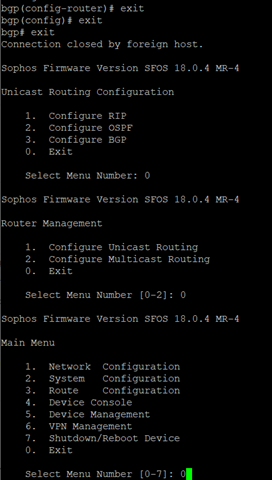
- Repeat steps 1-12 for the Sophos Firewall 02.
Important: Make sure to enter the ASN of the Sophos Firewall 02 instead of the Firewall 01 in the relevant fields!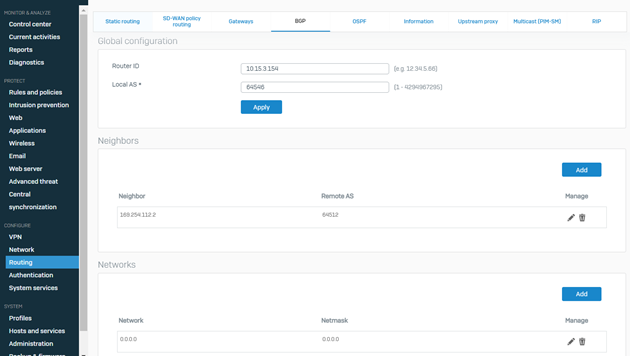

After the GRE tunnel is connected, the BGP peering would be established between firewall nodes and the TGW. The status can be checked from CONFIGURE > Routing > Information > BGP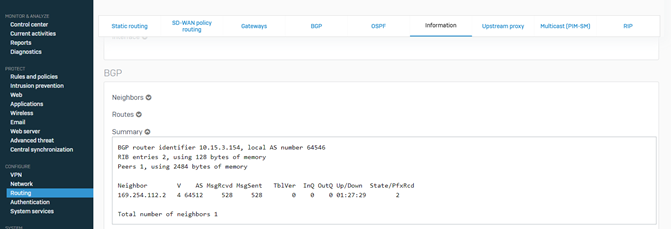
In AWS console, navigate to Services > VPC > Transit Gateways > Transit Gateway Attachments. Select the firewall connect attachment and in the Connect peers tab, it will show the status as UP for Transit gateway BGP 1 Status.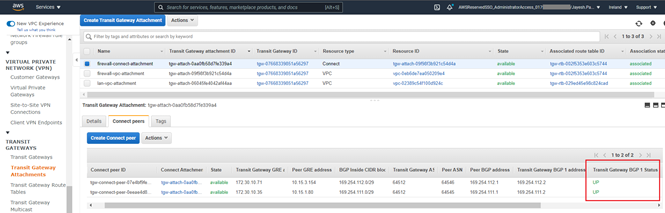
Caveats and additional information
AWS Network Load Balancer configuration
After deployment completes, the network load balancer used by the HA deployment will be configured to perform a health check on the firewall nodes using port TCP 4444.
Since this port is part of the management port range affected by the Trusted Network security group, health checks are expected to fail due to the load balancer not being a part of said trusted network range.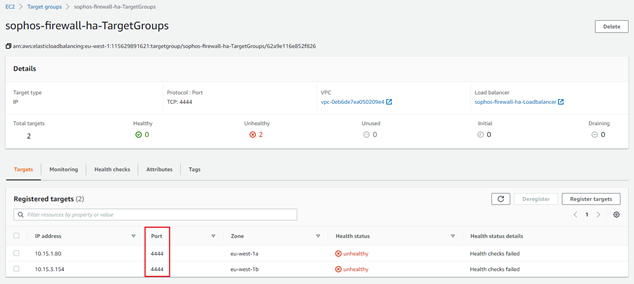
This is intentional as it avoids exposing the management ports or the load balancers to unintended traffic.
In order to make the AWS Network Load Balancer functional, we recommend modifying the existing health check to match the service port used by the content published on the firewall.
For example, if the WAF (Web Application Firewall) feature is being used to accept traffic on port TCP 443, we recommend setting the load balancer's health checks to use the same port. This ensures service delivery capabilities and health check status are aligned, making sure that failed firewall nodes are removed from service automatically.
Load balancer considerations for HA deployment
One important thing to note regarding the HA deployment is that due to the default health check using the WebAdmin port (TCP 4444), both nodes are (technically) available from an uptime perspective.
This has the potential to become an issue when publishing resources publicly through the load balancer when not accounted for, as the load balancer only checks the target group's node availability by default, not the reachability of resources published through the nodes in the target group.
Given that both the firewall nodes appear up when checking TCP 4444, but traffic to the internet only gets routed out through one of the firewalls and this result in a potential black-hole scenario (when the original requester's source address is unchanged) for any traffic that flows in through the load balancer and subsequently gets directed at the secondary node.
Note: This issue only applies in scenarios where the original request's source address is not changed to match one of the firewall node's local IP addresses. This means that the network setup that use the WAF or SNAT combined with DNAT are not affected.
In order to prevent this from happening, Sophos suggests configuring the load balancer's target group health checks to not use the default port (4444), but to check the specific service port used by the backend service and to use DNAT on the firewall nodes to translate the health check port to the relevant the backend system(s).
To illustrate this concept, let's examine an example of DNAT health check:
This scenario assumes a backend server listening on TCP port 25, with the load balancer publicly using the same port.
For this setup to work and health checks to correctly fail for the secondary node the following needs to be configured:
- Load balancer health check for the target group containing the Sophos Firewalls needs to be configured to TCP port 25
- Both the firewall nodes need to have a DNAT rule that forwards TCP port 25 traffic to the backend server
- The backend server's subnet needs to have a route table associated with it that routes either the source's host IP address (or range) or the default gateway to the transit gateway
With all this in place, the health check on the secondary node will fail, as the return traffic for any request routes through the secondary node will be sent to the primary firewall (as a result of routing preference on the TGW) where it is subsequently dropped as being out of sync.
This prevents black holes for traffic flowing in through the load balancer, as the secondary node will not be a viable target for the traffic until the primary node fails, upon which time the secondary node becomes the TGW's preferred route for the advertised network(s) and the health check succeeds.
For more details on health checks for target groups, see: https://docs.aws.amazon.com/elasticloadbalancing/latest/network/target-group-health-checks.html
This concludes the Sophos Firewall HA deployment instructions in this document.
To use the security and scanning features of Sophos firewall, feel free to refer to online documentation repository available via following link: https://www.sophos.com/en-us/support/documentation/sophos-Sophos-firewall.aspx
Updated Disclaimer
[edited by: Erick Jan at 9:21 AM (GMT -7) on 17 Apr 2023]

