

Disclaimer: This information is provided as-is for the benefit of the Community. Please contact Sophos Professional Services if you require assistance with your specific environment.
Hi Community,
This thread outlines how to limit downtime when re-imaging Sophos Firewall that are configured in HA.
Warning: This process will still result in an outage. Please plan ahead accordingly to account for this downtime.
Table of Contents
Preparation
First, download the latest firmware installation image from Sophos Licensing Portal https://www.sophos.com/mysophos
If the firmware version you are looking is unavailable via Sophos Licensing Portal and you prefer to stay on that version, please contact Sophos Technical Support to request for this image. It may take at least two business days for this.
Note: Sophos Support recommends to use latest firmware version. More info: Sophos Firewall Release Notes & News
The article applies to active-passive HA.
The steps below, assume the following:
- Node 1 is the current HA primary Node, and it is also the initial HA primary Node, which carries purchased license subscription.
- Node 2 is the current HA auxiliary Node.
To check if an Sophos Firewall in active-passive HA is the initial HA primary Node:
- Log on Sophos Firewall SSH terminal using admin account. Once authenticated, you will be presented with the Sophos Firewall console menu
- Go to 5. Device Management > 3. Advanced Shell
- Run the following commands:
nvram get "#li.serial"- The serial number of the Sophos Firewall is then displayed
nvram get "#li.master"- if output of nvram get "#li.master" is YES as shown below, then the Sophos Firewall is the initial HA primary Node:
XG210_WP02_SFOS 17.5.9 MR-9# nvram get "#li.master"
YES
- if output of nvram get "#li.master" is YES as shown below, then the Sophos Firewall is the initial HA primary Node:
- Note: The command nvram get "#li.master" is only used on Sophos Firewalls in active-passive HA, to identify which node is initial primary node. There is no concept of initial primary node in active-active HA.
Scenario 1: reimage HA auxiliary node
- If Sophos Firewall is registered to Sophos Central, it is recommended to deregister it. Then go to Sophos Central to make sure Sophos Firewall is removed.
- Download configuration backup from Node 1, and save to local computer.
- On Node 1 webadmin GUI, disable HA
- If Node 2 is connected to Node 1, once HA is disable on Node 1, Node 2 will reboot with factory default settings, except admin password, and peer administration IP.
- Don't disable HA on Node 2 webadmin GUI.
- Reimage Node 2 to same firmware version and firmware build number of Node 1. Here is guide for reimage.
- Initialize Node 2, configure WAN interface and connect cable on it, to allow it access Internet. Don't configure any LAN or DMZ interface yet.
- Register Node 2 serial number if it has not been done. Here is KBA for Sophos Firewall license registration.
- Make sure Node 2 has same firmware version and firmware build number as Node 1. Click here for details.
- Make sure msync service is UNTOUCHED or STOPPED on both Node 1 and Node 2. Click here for details.
- Configure active-passive HA as per product document "Configure active-passive HA using interactive mode".
- Make sure Node 1 is configured as the primary Node, and Node 2 as auxiliary node.
- Note: An outage will occur.
Scenario 2: reimage HA primary node
- If Sophos Firewall is registered to Sophos Central, it is recommended to deregister it. Then go to Sophos Central to make sure Sophos Firewall is removed.
- Download configuration backup from Node 1, and save to local computer.
- on Node 1 webadmin GUI, perform HA failover, to make Node 2 primary node.
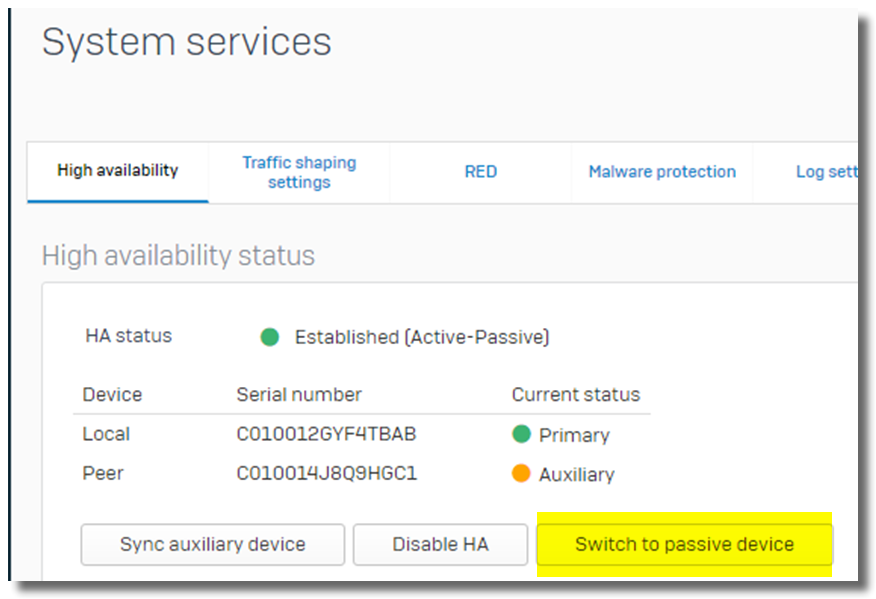
- Click on "Switch to passive device", as below
- Note: An outage will occur.
- Click on "Switch to passive device", as below
- Reimage Node 1 with same firmware version and firmware build number as Node 2. Here is guide for reimage.
- Initialize Node 1, configure WAN interface and connect cable on it, to allow it access Internet. Don't configure any LAN or DMZ interface yet.
- Register Node 1 serial number if it has not been done. Here is KBA for Sophos Firewall license registration
- Unplug all cables from Node 1, except the one connecting to your laptop.
- Restore configuration to Node 1.
- Cut traffic over from Node 2 to Node 1.
- Note: 2nd outage will occur.
- Factory reset Node 2.
- Initialize Node 2, configure WAN interface and connect cable on it, to allow it access Internet. Don't configure any LAN or DMZ interface yet.
- Register Node 2 serial number if it has not been done.
- Make sure Node 2 has same firmware version and firmware build number as Node 1. Click here for details.
- Make sure msync service is UNTOUCHED or STOPPED on both Node 1 and Node 2. Click here for details.
- Configure active-passive HA as per product document "Configure active-passive HA using interactive mode".
- Make sure Node 1 is configured as the primary Node, and Node 2 as auxiliary node.
- Note: 3rd outage will occur.
Step 9 and 10 are to get Node 2 prepared for HA, and they are not necessary if you can properly re-configure IP address of all interfaces on Node 2.
Scenario 3: reimage both HA nodes and upgrade them to latest firmware
- If Sophos Firewall is registered to Sophos Central, it is recommended to deregister it. Then go to Sophos Central to make sure Sophos Firewall is removed.
- Download configuration backup from Node 1, and save to local computer.
- on Node 1 webadmin GUI, perform HA failover, to make Node 2 primary node.
- Click on "Switch to passive device", as below
- Note: An outage will occur.
- Click on "Switch to passive device", as below
- Reimage Node 1 with latest firmware. Here is guide for reimage.
- Initialize Node 1, configure WAN interface and connect cable on it, to allow it access Internet. Don't configure any LAN or DMZ interface yet.
- Register Node 1 serial number if it has not been done. Here is KBA for Sophos Firewall license registration
- Unplug all cables from Node 1, except the one connecting to your laptop.
- Restore configuration to Node 1.
- Cut traffic over from Node 2 to Node 1.
- Note: 2nd outage will occur.
- Reimage Node 2 with the same firmware as Node 1.
- Initialize Node 2, configure WAN interface and connect cable on it, to allow it access Internet. Don't configure any LAN or DMZ interface yet.
- Register Node 2 serial number if it has not been done.
- Make sure Node 2 has same firmware version and firmware build number as Node 1. Click here for details.
- Make sure msync service is UNTOUCHED or STOPPED on both Node 1 and Node 2. Click here for details.
- Configure active-passive HA as per product document "Configure active-passive HA using interactive mode".
- Make sure Node 1 is configured as the primary Node, and Node 2 as auxiliary node.
- Note: 3rd outage will occur.
Scenario 4: rebuild HA after RMA of auxiliary node
Assume the following
- Primary Node 1 is running as HA standalone.
- Auxiliary Node 2 gets RMA, and RMA replacement has arrived.
Here is steps to rebuilld HA after RMA of auxiliary node
- Initialize RMA replacement, configure WAN interface and connect the cable on it, to allow it to access internet. Don't configure any LAN or DMZ interface yet.
- Register it to Sophos Licensing Portal, https://www.sophos.com/mysophos, and activate 30 days trial license on it.
- Make sure the appliance has same firmware version and firmware build number as Node 1. Click here for details.
- Disable HA on Node 1, if you haven't
- Make sure msync service is UNTOUCHED or STOPPED on both RMA replacement and Node 1. Click here for details.
- Configure active-passive HA as per product document "Configure active-passive HA using interactive mode"
Scenario 5: rebuilld HA after RMA of primary node
Assume the following
- Primary Node 1 gets RMA, and RMA replacement has arrived.
- Auxiliary Node 2 is running as HA standalone.
Here is steps to rebuilld HA after RMA of primary node
- If Sophos Firewall is registered to Sophos Central, it is recommended to deregister it. Then go to Sophos Central to make sure Sophos Firewall is removed.
- Download configuration backup from Node 2, and save to local computer.
- Reimage RMA replacement with same firmware version and firmware build number as Node 2. Here is guide for reimage.
- Initialize RMA replacement, configure WAN interface and connect cable on it, to allow it access Internet. Don't configure any LAN or DMZ interface yet.
- Register it to Sophos Licensing Portal, https://www.sophos.com/mysophos, and activate 30 days trial license on it.
- Restore configuration to RMA replacement
- Cut traffic over from Node 2 to RMA replacement.
- Note: an outage will occur.
- Factory reset Node 2.
- Initialize Node 2, configure WAN interface and connect cable on it, to allow it access Internet. Don't configure any LAN or DMZ interface yet.
- Register Node 2 serial number if it has not been done.
- Make sure Node 2 has same firmware version and firmware build number as Node 1. Click here for details.
- Make sure HA is disabled on RMA replacement.
- Make sure msync service is UNTOUCHED or STOPPED on both RMA replacement and Node 2. Click here for details.
- Configure active-passive HA as per product document "Configure active-passive HA using interactive mode".
- Make sure RMA replacement is configured as the primary Node, and Node 2 as auxiliary node.
- Note: 2nd outage will occur.
- Transfer license from Node 1 to RMA replacement. Here is KBA for license transfer.
Step 7 and 8 are to get Node 2 prepared for HA, and they are not necessary if you can properly re-configure IP address of all interfaces on Node 2.
Appendix
Check pattern and hotfix version
- Please run Advanced Shell command
cish -c "system diag sh ver" - Firmware Version and Firmware Build need to be matched on both HA nodes.
- Here is an example output
XGS2100_RL01_SFOS 19.0.1 MR-1-Build365# cish -c "system diag sh ver"

Serial Number: X21010M00000000
Device-Id: 34c499dbbff39fa000000000000000000000
Appliance Model: XGS2100
Firmware Version: SFOS 19.0.1 MR-1-Build365
Firmware Build: 365
Firmware Loader version:
HW version: RL01
BIOS Version: Ver-V111 Rev-5.14
NPU version: rootfs-2022.0526-1509-670-v19.0.Dev.040.Akamaru
Uboot version: U-Boot 2019.10-10.3.8.0-1 (Jun 13 2021 - 19:39:53 -0400)
CPLD version: Module version
 AMDA0202-0001 0x05000008
AQR version: -
Config DB version: 19.005
Signature DB version: 19.005
Report DB version: 19.005
Web Proxy version: compiled
SMTP Proxy version: 1.0
POP/IMAP Proxy version: 1.0.0.3.4
Logging Daemon version: 0.0.0.17
AP Firmware: 11.0.019
ATP: 1.0.0437
Avira AV: 1.0.420180
Authentication Clients: 1.0.0020
Geoip ip2country DB: 2.0.014
IPS and Application signatures: 18.19.76
Sophos Connect Clients: 2.2.000
odt: 1.0.006
RED Firmware: 3.0.008
Sophos AntiSpam Interface: 1.0.238
Sophos AV: 1.0.18191
SSLVPN Clients: 1.0.009
Hot Fix version: 5
Hotfix tag: HF092122.1

XGS2100_RL01_SFOS 19.0.1 MR-1-Build365#
Check msync service status
- Please run Advanced Shell command
service -S | grep msync - For HA setup, it needs to be STOPPED or UNTOUCHED.
- Here is expected output
XGS2100_RL01_SFOS 19.0.1 MR-1-Build365# service -S | grep msync
msync UNTOUCHED
XGS2100_RL01_SFOS 19.0.1 MR-1-Build365#
Edition History
- 2022-10-18, removed content of SFOS v17; renamed some scenarios; updated URLs; renamed XG firewall to Sophos Firewall
- 2022-02-06, updated URLs
- 2021-10-18, added scenario "rebuilld HA after RMA of auxiliary node"
- 2021-09-07, fixed typo
- 2021-02-17, major update
- 2020-02-07, first edition
Updated Disclaimer
[edited by: Erick Jan at 2:09 PM (GMT -7) on 17 Apr 2023]