Guest User!

You are not Sophos Staff.

This discussion has been locked.
You can no longer post new replies to this discussion. If you have a question you can start a new discussion

unbrick APX120, break bootdelay=0 & recover APX120

Here is one way to break the APX120 uBoot and enter the uBoot cli environment...

Connect your serial port to the 4 pin header, setup putty and grab a cable connected to GND..

Don´t connect Pin 1 (3.3V) and use 2,3,4 (TX,GND,RX)

Powerup the APX120 and right after you see the first boot messages, just before u-Boot 2012.07 ... comes up
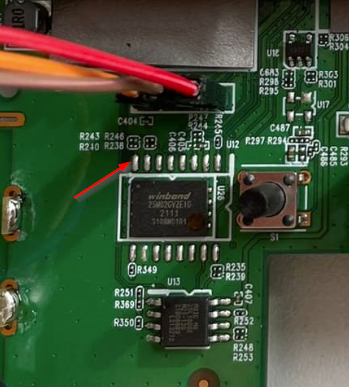
pull the SO/SIO1 from the SOIC 300-mil layout to GND (U26, Pin 8).

it´s needs a good timing and maybe some retries.

AND you would need a good USB/RS232 Adapter (Prolific PL2303HXD or maybe PL2303RA).

uBoot will enter the default environment, from here you can try to change bootdelay.. 

one drawback ...

if you change the bootdelay and save the environment you lose all settings for a successfull APX boot.
But you could reset the APX120 now, enter u-Boot again and you will have a clean uBoot environment.

From here you could set the neccesary environment variables and load the apx.uimage later on.

U-Boot 2012.07 [Chaos Calmer unknown,unknown] (Nov 02 2018 - 08:13:09)

smem ram ptable found: ver: 1 len: 3
DRAM:  256 MiB
@machid : 0x8010100
NAND:  SF NAND unsupported id:0:8:20:21SF NAND unsupported id:0:8:20:21SF: Detected default with page size 64 KiB, total 16 MiB
SF: Detected default with page size 64 KiB, total 16 MiB
ipq_spi: page_size: 0x100, sector_size: 0x10000, size: 0x1000000
32 MiB
MMC:
*** Warning - bad CRC, using default environment

In:    serial
Out:   serial
Err:   serial
machid: 8010100
flash_type: 0
Hit any key to stop autoboot:  0
nand1: partitioning exceeds flash size
Error initializing mtdparts!

(APX120) #

Update (04.03.2023)

For those, that want to try a debrick.

Here is a serial log, that i can provide, it shows the boot process after modding bootdelay and entering uBoot CLI, loading an APX.uimage, entering Root Shell and loading the Update image from Sophos.

You need to press enter after loading the kernel and from here you get the OpenWrt Shell.
Connect the APX to your ISP Router and from root, load the image from Sophos and start the update script.

The script is part of the image and fixed the NAND  Layout (UBI, filesystem, etc....) and writes all that was required.

U-Boot 2012.07 [Chaos Calmer unknown,unknown] (Nov 02 2018 - 08:13:09)

smem ram ptable found: ver: 1 len: 3
DRAM:  256 MiB
@machid : 0x8010100
NAND:  spi_nand: spi_nand_flash_probe SF NAND ID 0:ef:ab:21
SF: Detected W25M02GV with page size 2 KiB, total 256 MiB
SF: Detected MX25L1605D with page size 4 KiB, total 2 MiB
ipq_spi: page_size: 0x100, sector_size: 0x1000, size: 0x200000
258 MiB
MMC:
In:    serial
Out:   serial
Err:   serial
machid: 8010100
flash_type: 0
Hit any key to stop autoboot:  0
Net:   MAC0 addr:xx:xx:xx:xx:xx:xx
PHY ID1: 0x4d
PHY ID2: 0xd0b2
ipq40xx_ess_sw_init done
eth0

(APX120) # tftpboot APX.v2.1.1-1.uimage
eth0 PHY0 Down Speed :10 Half duplex
eth0 PHY1 Down Speed :10 Half duplex
eth0 PHY2 Down Speed :10 Half duplex
eth0 PHY3 Down Speed :10 Half duplex
eth0 PHY4 up Speed :1000 Full duplex
Using eth0 device
TFTP from server 192.168.1.8; our IP address is 192.168.1.1
Filename 'APX.v2.1.1-1.uimage'.
Load address: 0x84000000
Loading: #################################################################
         #################################################################
         #################################################################
         #################################################################
         #################################################################
         #################################################################
         #################################################################
         #################################################################
         #################################################################
         #################################################################
         #################################################################
         #################################################################
         #################################################################
         #################################################################
         #################################################################
         #################################################################
         #################################################################
         #################
done
Bytes transferred = 16465885 (fb3fdd hex)
(APX120) # bootm 0x84000000#config@4
## Booting kernel from FIT Image at 84000000 ...
   Using 'config@4' configuration
   Trying 'kernel@1' kernel subimage
     Description:  ARM OpenWrt Linux-3.14.43
     Type:         Kernel Image
     Compression:  uncompressed
     Data Start:   0x840000e4
     Data Size:    16217188 Bytes = 15.5 MiB
     Architecture: ARM
     OS:           Linux
     Load Address: 0x80208000
     Entry Point:  0x80208000
node name: signature@1
     Sign algo:    sha256,rsa4096
     Sign value:   2544f5d8c17be345ae9f041107ae647c4b01638eb982275c0cb2c89c72c6703fee7ed2f86e112635f4c41644ac4d053c4d14f40a8f55c843d2252f143fa4a4343ab364470ba7fc75f3108e67c0fa712f34ca8c8ac53c31b0ba8fe995fb340ead4ee2ccdf41a5ef9c6b3e8cb7c08b8c2d7eb5f02ed2211bdd8cd9802ea08dae2132961bcd76f39c5abae21f1e89064d3812247711e9f1350bfa45c61330fb260b0631050c17e7f49708ad7a5ce06ea06414a4d27f921ed33a7cba0fbd2330a973ba6dde54a9287a418dc6f8ba520a91381ef0b4165e49c5ba7e694dc0175905f57e9bd37204eaee687b8c8cf108726f9a0f6386620e70528f0a9700d725cc4272fa73dff59a26ac19de1643823660bbf94db5def4a017c886347285ad77060924019616ebccef94a597a10c8e7e9dff0a6e6492931ab29602f08b54eabe957df80848f3d10a3e00c36c9b3c3a22acafec84037da896425ac82356ae43105a36b52b51eb3f2d2b3b6305b7363e66742873f66072926015edba6eb612fade9cb3e38cfda2b433836ac5bc7873d215b352211bb448a8d6766f6d34bfb6aa1d044cb4d21d023386f3a4e6e37cd3fbed97391311c6875ea94a8a84b8027570aa310883e6e63029c2ab42a33b3671aa63edd4d7d6386822889182fa0915589d109b41ee345b685cb540bf5c70e873eccca35ab4a0cd31cb32110302fe0009109836a2f4
   Verifying Hash Integrity ... sha256+ OK
## Flattened Device Tree from FIT Image at 84000000
   Using 'config@4' configuration
   Trying 'fdt@4' FDT blob subimage
     Description:  ARM OpenWrt Sophos-APX device tree blob
     Type:         Flat Device Tree
     Compression:  uncompressed
     Data Start:   0x84f8cd88
     Data Size:    33944 Bytes = 33.1 KiB
     Architecture: ARM
node name: signature@1
     Sign algo:    sha256,rsa4096
     Sign value:   b10820c244a7e9eee31fe5e0960b5d92734dc256f2a869cdd6834aa48842e95a803388cbab8d03a2227b50c07bd5f4bd536cb022134ab02863cec311d16ac8cd771218e23d68377d231a6642a3c4e9a5dcfa4754ada194b91e793470b8a784fe3ab8f646f419a0c4f38c3a5c4c86931108b4c926ac1a463cd4313459a7ea8f762ba8b141e1452c457520d6d4951f69a3cc6f9f8f6e60a189372393d7e41baa6788ddbd0330cf0ab962f506b34b1e4620217b05a45b2c10e81b9129b6cba3178fd4565b27be38f15f412e8f7df850e04bc434b938f116cd3d4dbaa941ca704b1896ef96a5af379f7bae826dfc166f8a3ed957a62a8dc8a815c4b09293aca868cf672a67f06ff81c8e397fd01abdb7ba48933f5ffa27563db558fb1ab7217fcac02b6a31faf1a86f9db430b23bf5261a8aaad03f9be8955e9c5a72b372dc91b558f52278698947ea04c46276a8ba13768cb2fe9386cf273e08b95abebcca4219632f730162a7ed9fe949551e1dc2546adfb64ae6d759421f5de48ad148d920b354b9b07196460aea74f8c4adece41e0e33ee0a009cbb3086c6e26131e6a07b6f21cfeaa7b34fe06a007c8972512bcc8b2f331151b160d9affae312bba7d03a800f8b93b8745121de78c326e90b869dd4415b48d84309614cd8d25727c6a852a456c57617cf764b02a4afdfab338a0d09a6d5d8114b68ea5a39b12cd04bae16074f
   Verifying Hash Integrity ... sha256+ OK
   Booting using the fdt blob at 0x84f8cd88
   Loading Kernel Image ... OK
OK
   Loading Device Tree to 87064000, end 8706f497 ... OK
eth1 MAC Address from ART is not valid
Using machid 0x8010100 from environment

Starting kernel ...

Press the [f] key and hit [enter] to enter failsafe mode
Press the [1], [2], [3] or [4] key and hit [enter] to select the debug level
Please press Enter to activate this console.

Booting. (Version: v2.1.1-1)
Checking The AP model
Starting network configuration for ethernet interface over DHCP.
dnsserver entries are missing
Cloud certificate validation pending.
UTM certificate validation pending.
Ethernet autoconfiguration (bound): IP:192.168.1.1, gateway:192.168.1.254, nameservers:192.168.1.254
Ethernet link state changed to: up, Speed: 1000, Duplex: full

BusyBox v1.23.2 (2018-11-27 07:01:45 UTC) built-in shell (ash)

FIRMWARE_VERSION: v2.1.1-1

root@(none):/# wget https://d2apih4urmzzdu.cloudfront.net/v2.3.2-1/APX.uimage
root@OpenWrt:/bin# update_image.sh APX.uimage


This thread was automatically locked due to age.
Parents
  • Hi,

    more information, howto unbrick a APX120

    After entering thr default environment for uBoot, the environment is set to default values and the NAND chip is not recogniced.
    we now need to do the following

    • set the required environment
    • set autoboot delay to 5s
    • repower APX120
    • enter uBoot
    • erase nand chip
    • tftpload APX.uimage
    • boot kernel
    • wget desired firmware
    • run update_image.sh script
    • reboot

    So after entering the default mode, just set the environemt with these cmd..

    set BASEMAC and SID according your device

    setenv BASEMAC 7C:5A:AB:CD:EF:GH
    setenv SID P3200341234567
    setenv baudrate 115200
    setenv bootargs mtdparts=spi0.1:0x8000000(rootfs) ubi.mtd=rootfs loglevel=1
    setenv bootcmd apx_check_reset_button\;run ubiboot\;run ubiboot_backup\;reset
    setenv bootdelay 10
    setenv ethact eth0
    setenv flash_type 0
    setenv ipaddr192.168.1.1
    setenv machid 8010100
    setenv mtddevname rootfs
    setenv mtddevnum 0
    setenv mtdids nand1=nand1
    setenv mtdparts mtdparts=nand1:0x10000000(rootfs)
    setenv partition nand1,0
    setenv radio0_select_5g 0
    setenv serverip 192.168.1.8
    setenv stderr serial
    setenv stdin serial
    setenv stdout serial
    setenv store_crashdump setenv crashdump_fix 1
    setenv ubiboot ubi part rootfs\;ubi read 0x84000000 image\;bootm 0x84000000#config@4
    setenv ubiboot_backup ubi part rootfs\;ubi read 0x84000000 image_backup\;setenv bootargs mtdparts spi0.1:0x8000000(rootfs) ubi.mtd rootfs OLD_IMAGE_BOOTED\;bootm 0x84000000#config@4
    setenv wipe_config ubi part rootfs\;ubi remove config\;ubi remove dyn_cfg\;ubi remove dyn_cfg_backup
    

    run saveenv

    (APX120) # saveenv
    Saving Environment to NAND...
    Erasing Nand...
    Erasing at 0xef000 -- 100% complete.
    Writing to Nand... done

    Now Restart your device (Power Off/ON)

    (APX120) # nand erase.chip
    ..
    (APX120) # tftpboot APX.v2.1.1-1.uimage
    ..
    (APX120) # bootm 0x84000000#config@4
    .....
    
    FIRMWARE_VERSION: v2.1.1-1
    
    root@OpenWrt:/# wget http://FQDN/APX.uimage
    ..
    root@OpenWrt:/bin# update_image.sh APX.uimage
    
    # this will take a few minutes and then reboot
    
    root@OpenWrt:/# reboot
    ..

    if you need to clear environment variables use this

    setenv SID
    saveenv

    Just enter the variable with no value and it´s cleared.
    Don´t forget to save ...

    And if you have ; in a environment variable, use a leading  \ , like \;

  • Hi, where can I get APX.uimage?

Reply Children
  • Hi Esrom,

    Thank you for reaching out to Sophos Community.

    There is no downloadable apx.image.

    However, you may check this KB for reference with the flashing tool

    support.sophos.com/.../KB-000039314

    Erick Jan
    Community Support Engineer | Sophos Technical Support
    Sophos Support Videos Product Documentation  |  @SophosSupport  | Sign up for SMS Alerts
    If a post solves your question use the 'Verify Answer' link.

  • Hi, can anyone help. The "uimage" files of all apx are in the place where the pattern update is downloaded inside the XG/XGS Firewall.
    /content/apfw_1.00/current_version/APX*.uimage

    Example: /content/apfw_1.00/11.0.020/APX120.uimage

  • Hi Esrom,

    Apologies for the misunderstanding.

    Upon checking, this can only be done in Backup & Firmware > Pattern Updates > AP Firmware 

    Erick Jan
    Community Support Engineer | Sophos Technical Support
    Sophos Support Videos Product Documentation  |  @SophosSupport  | Sign up for SMS Alerts
    If a post solves your question use the 'Verify Answer' link.

  • Hi Esrom,

    you can upgrade the APX*.uimage in many ways

    • use XG/XGS at Pattern Update -> Firmware

    (following will need a serial connection to APX120, APX320 has console port)

    • Change autoboot value to 5s (only in a working APX) and enter uBoot  
    • use a glitch and break uBoot with a paperclip (shorting NAND and rewrite all uBoot settings)
    • use a SOIC-8 Clip from POMONA and read/write a new boot loader from a good APX120
    • maybe there is a hidden uBoot escape sequence to break uBoot (i don´t know).

    After u entered uBoot you need to setup a tftp environment, clear the NAND in uBoot and load the new image.
    This new image needs to be executed and loaded from cli, after a few reboots and a couple of minutes later, the APX (only with 11.0.019) will register in XG and you can enable it. But don´t upgrade to 11.0.020..

    I used some of the old APX  images for testing. some didn´t work well, some gave an root logon without any password.

    But the last APX 11.0.019 did a recent job in debricking.

    If all fails, use APX.image Build v2.3.2-1, Sophos can provide you a link. 

    But the new APX 11.0.0.20 will brick some APX320 and APX120 revisions, Sophos will swap these models if they are still under warranty.

  • Hello Juergen,

    do you have the environment for a APX320 or APX320X?
    I used your environment for the APX120 and changed some values accordingly, the AP boots from the tftp-loaded image and I can enter the busybox but after a few seconds, a "[" appears and the AP reboots.

    I already tried to kill the watchdog processes, but it still reboots.

    Do you know where the APX 11.0.019 or APX.image Build v2.3.2-firmware is available? On my firewalls, only the newest image is available.

    This is the environment I used.

    baudrate=115200
    bootargs=mtdparts=spi0.1:0x8000000(rootfs) ubi.mtd=rootfs loglevel=1
    bootcmd=apx_check_reset_button;run ubiboot;run ubiboot_backup;reset
    bootdelay=10
    bootfile=APX.uimage
    ethact=eth0
    flash_type=0
    ipaddr=192.168.1.1
    ipaddr=192.168.1.1
    machid=8010006
    mtdids=nand0=nand0
    mtdparts=mtdparts=nand0:0x20000000(rootfs)
    partition=nand0,0
    radio0_select_5g=0
    serverip=192.168.1.12
    stderr=serial
    stdin=serial
    stdout=serial
    store_crashdump=setenv crashdump_fix 1
    ubiboot=ubi part rootfs;ubi read 0x84000000 image;bootm 0x84000000#config@1
    ubiboot_backup=ubi part rootfs;ubi read 0x84000000 image_backup;setenv bootargs mtdparts spi0.1:0x8000000(rootfs) ubi.mtd rootfs OLD_IMAGE_BOOTED;bootm 0x84000000#config@1
    wipe_config=ubi part rootfs;ubi remove config;ubi remove dyn_cfg;ubi remove dyn_cfg_backup

    I have a working APX320 on hand, but I cannot access the uboot shell as autoboot is set to 0 and the busybox shell is password protected.

  • Hi,

    if you have a working APX320 just connect to the APX from the firewall and enter the shell.
    From the shell you can change autoboot to 10, restart the APX and connect by console.

    root@OpenWrt:~# fw_setenv bootdelay 10

    Then you could just dump the complete NAND or just the 11.0.020-1 image.

    Here is copy of a working APX320

    BusyBox v1.23.2 (2022-07-08 11:09:20 UTC) built-in shell (ash)
    
    FIRMWARE_VERSION: 11.0.020-1
    root@OpenWrt:~# printenv
    -ash: printenv: not found
    root@OpenWrt:~# fw_printenv
    BASEMAC=7C:**:**:**:**:**
    REGDOMAIN=ETSI
    SID=P52008*********
    baudrate=115200
    bootargs=ubi.mtd=rootfs loglevel=1
    bootcmd=apx_check_reset_button;run ubiboot;run ubiboot_backup;run flashtool;reset
    bootdelay=0
    cfg_radio0_2g=setenv radio0_select_5g
    cfg_radio0_5g=setenv radio0_select_5g 1
    ethact=eth0
    flash_type=0
    flashtool=setenv ipaddr 169.254.12.34;setenv serverip 169.254.12.35;flashtool sendmagic 125 300000;flashtool check_image;source $loadaddr:script@1
    hw_aid=1
    hw_majver=1
    hw_minver=1
    ipaddr=192.168.1.1
    loadaddr=0x88000000
    machid=8010006
    mtddevname=rootfs
    mtddevnum=0
    mtdids=nand0=nand0
    mtdparts=mtdparts=nand0:0x20000000(rootfs)
    partition=nand0,0
    preboot=ubi part rootfs;sf probe
    production_date_utc_unix_timestamp=1663119535
    radio0_select_5g=0
    serverip=192.168.1.254
    stderr=serial
    stdin=serial
    stdout=serial
    ubiboot=ubi read 0x88000000 image;bootm 0x88000000#config@1
    ubiboot_backup=ubi read 0x88000000 image_backup;setenv bootargs ${bootargs} OLD_IMAGE_BOOTED;bootm 0x88000000#config@1
    wipe_config=ubi remove config;sf erase 0x200000 0x100000;sf erase 0x300000 0x100000

  • Hi, actualy i have this situation


    U-Boot 2012.07 [Chaos Calmer unknown,unknown] (Nov 02 2018 - 08:13:09)

    smem ram ptable found: ver: 1 len: 3
    DRAM:  256 MiB
    @machid : 0x8010100
    NND:  spi_nand: spi_nand_flash_probe SF NAND ID 0:ef:ab:21
    SF: Detected W25M02GV with page size 2 KiB, tot`@ d5(@▒▒5R▒e▒*▒▒R▒kW.▒KW▒-Y'L'L'L▒,▒*$*▒▒R▒kW.▒KW▒-Y'L'L'L▒,▒*▒'▒UkW.▒KW▒+▒▒▒V▒,]]▒Y▒▒00
    ipq_spi: SPI Flash not found (bus/cs/speed/mode) = (0/0/48000000/0)
    256 MiB
    MMC:
    *** Warning - readenv() failed, using default environment

    In:    serial
    Out:   serial
    Err:   serial
    machid: 8010100
    flash_type: 0
    Hit any key to stop autoboot:  0
    Creating 1 MTD partitions on "nand1":
    0x000000000000-0x000004000000 : "mtd=0"
    UBI: attaching mtd1 to ubi0
    UBI: physical eraseblock size:   131072 bytes (128 KiB)
    UBI: logical eraseblock size:    126976 bytes
    UBI: smallest flash I/O unit:    2048
    UBI: VID header offset:          2048 (aligned 2048)
    UBI: data offset:                4096
    UBI error: ubi_read_volume_table: the layout volume was not found
    UBI error: ubi_init: cannot attach mtd1
    UBI error: ubi_init: UBI error: cannot initialize UBI, error -22
    UBI init error 22

    (APX120) #

    Stopped the autoboot...but i cant see what i whrite.... can somebody help me ? thanks.

  • Hi,

    if you can‘t see any input you need a different rs232-usb Adapter. And only use TXD,RXD and GND and Power the APX from PSU.

    Sometimes a NAND Glitch doesn‘t show any input from RS232.

    How did you break uBoot?

    don‘t try to change any env settings in this state.

  • hi, i resolved with 5v power of rs-usb adapter.

    now i have this..

    eth0 PHY4 up Speed :1000 Full duplex
    Using eth0 device
    TFTP from server 192.168.1.8; our IP address is 192.168.1.11
    Filename 'APX.v2.1.1-1.uimage'.
    Load address: 0x84000000
    Loading: T T T T T T T T T T T T T T

    i conntected the eth cable to windows secondary lan door... and bridge (via win11) ....is ok ? or i make  some error ? thanks.

  • Hallo Jürgen, heißt mit einem PoE-Injector geht das nicht?